WHMCS Configuration
This integration works with HSPs, Resellers, and Marketplaces.
Blackwall provides an integration plugin for the WHMCS billing system.
Install the plugin
We recommend managing Blackwall via GateKeeper directly or one of Blackwall's integration modules, not both. Running them concurrently can cause configuration conflicts and complicate troubleshooting. Pick one interface and use it consistently for all changes. This matters especially in hosted environments, where service providers don't have access to customer integration module instances.
To install the Blackwall plugin on the WHMCS server:
-
Download the archive with the extension:
or -
Extract the contents of the archive to the path where WHMCS is installed, like:
-
Set the required permissions for the extracted folder:
Note
WHMCS directory path and username may differ in various Linux distributions.
Configure the plugin
Before configuring the pluging, ensure that you have understood the following terminology overview:
- Server = the GateKeeper API endpoint.
- Server Group = the WHMCS group that points products to a GateKeeper instance.
- Product Group = the storefront/order-form category that contains customer-facing products.
- Product = the item customers order in WHMCS.
To configure the plugin, perform each of the following sub-steps:
- Add your Blackwall server.
- Create a WHMCS Server Group and add your Blackwall server to it.
- Create a WHMCS Product Group.
- Create a WHMCS Product.
- Assign the Server Group to the product.
Each product can use a different Server Group, allowing you to connect different products to different GateKeeper instances.
Add the Blackwall server
- Log in to your WHMCS account using your login credentials.
-
Once your account homepage loads, from the top-right corner of the WHMCS admin panel, click
 .
.
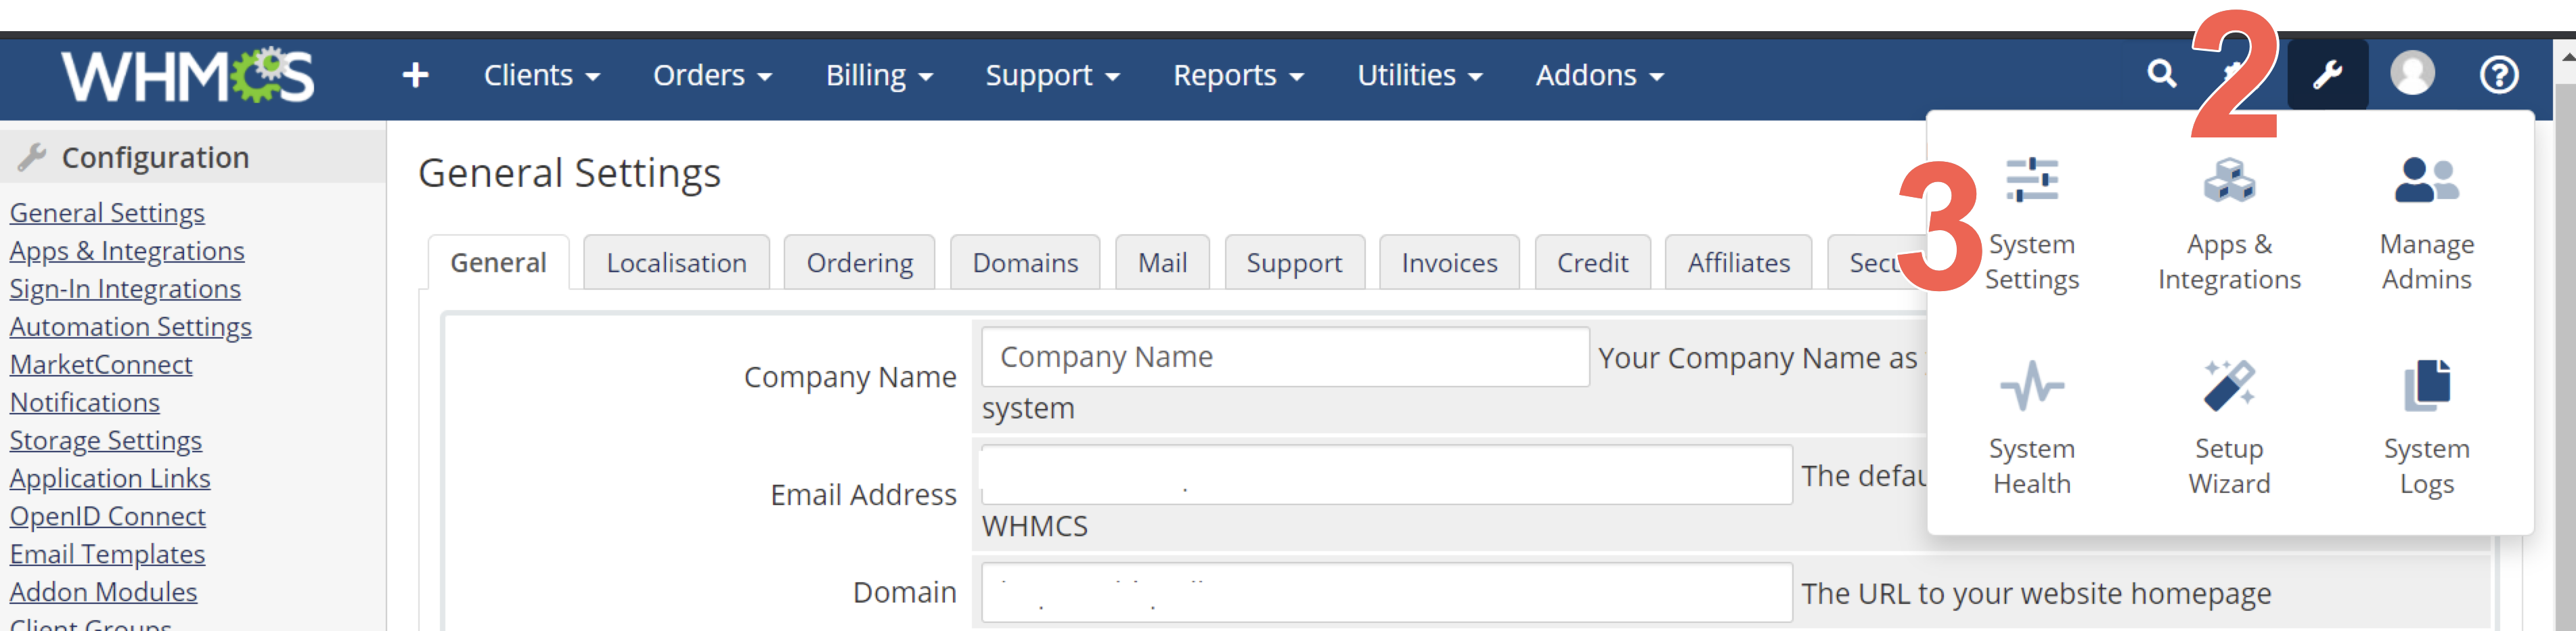
-
From the options displayed, select System Settings.
-
In the search field on the System Settings page, enter 'server'.
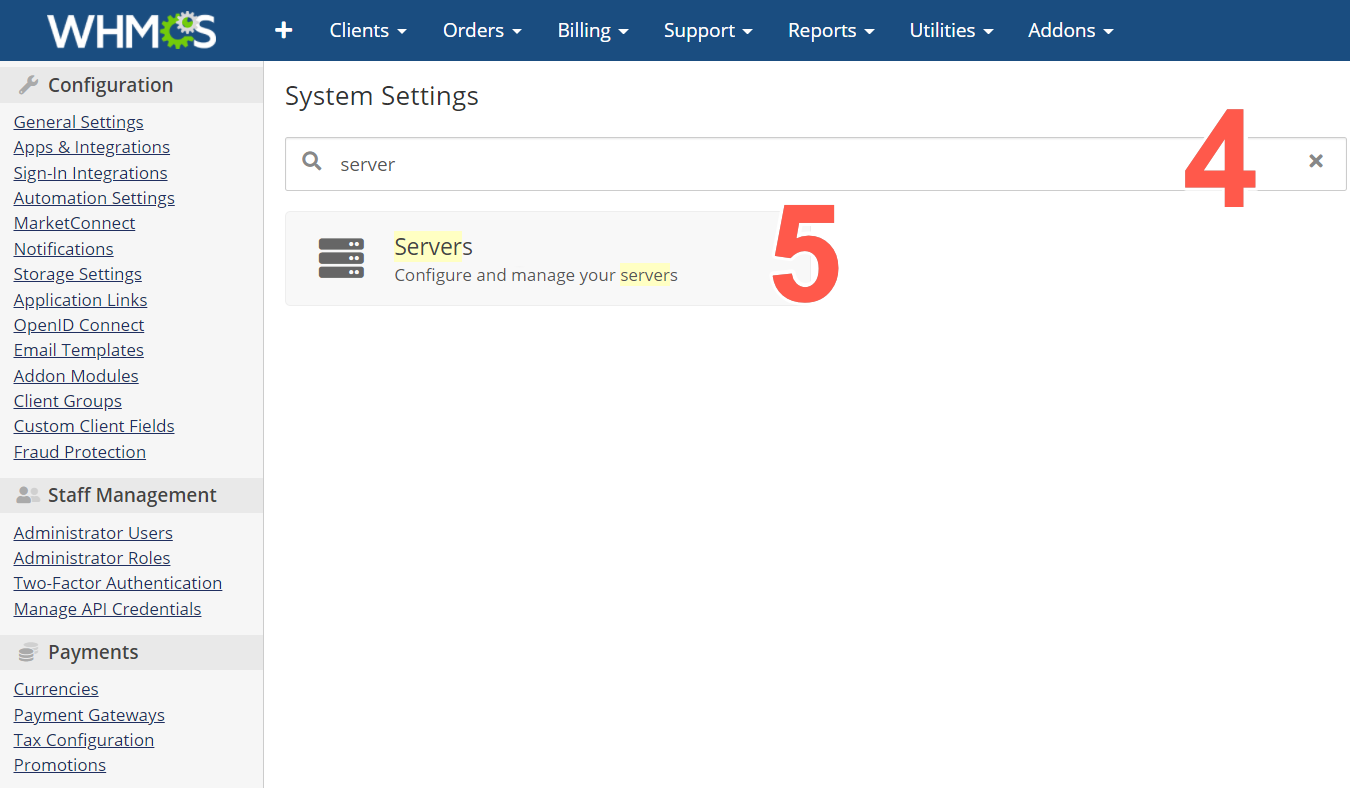
-
Click the Servers widget.
-
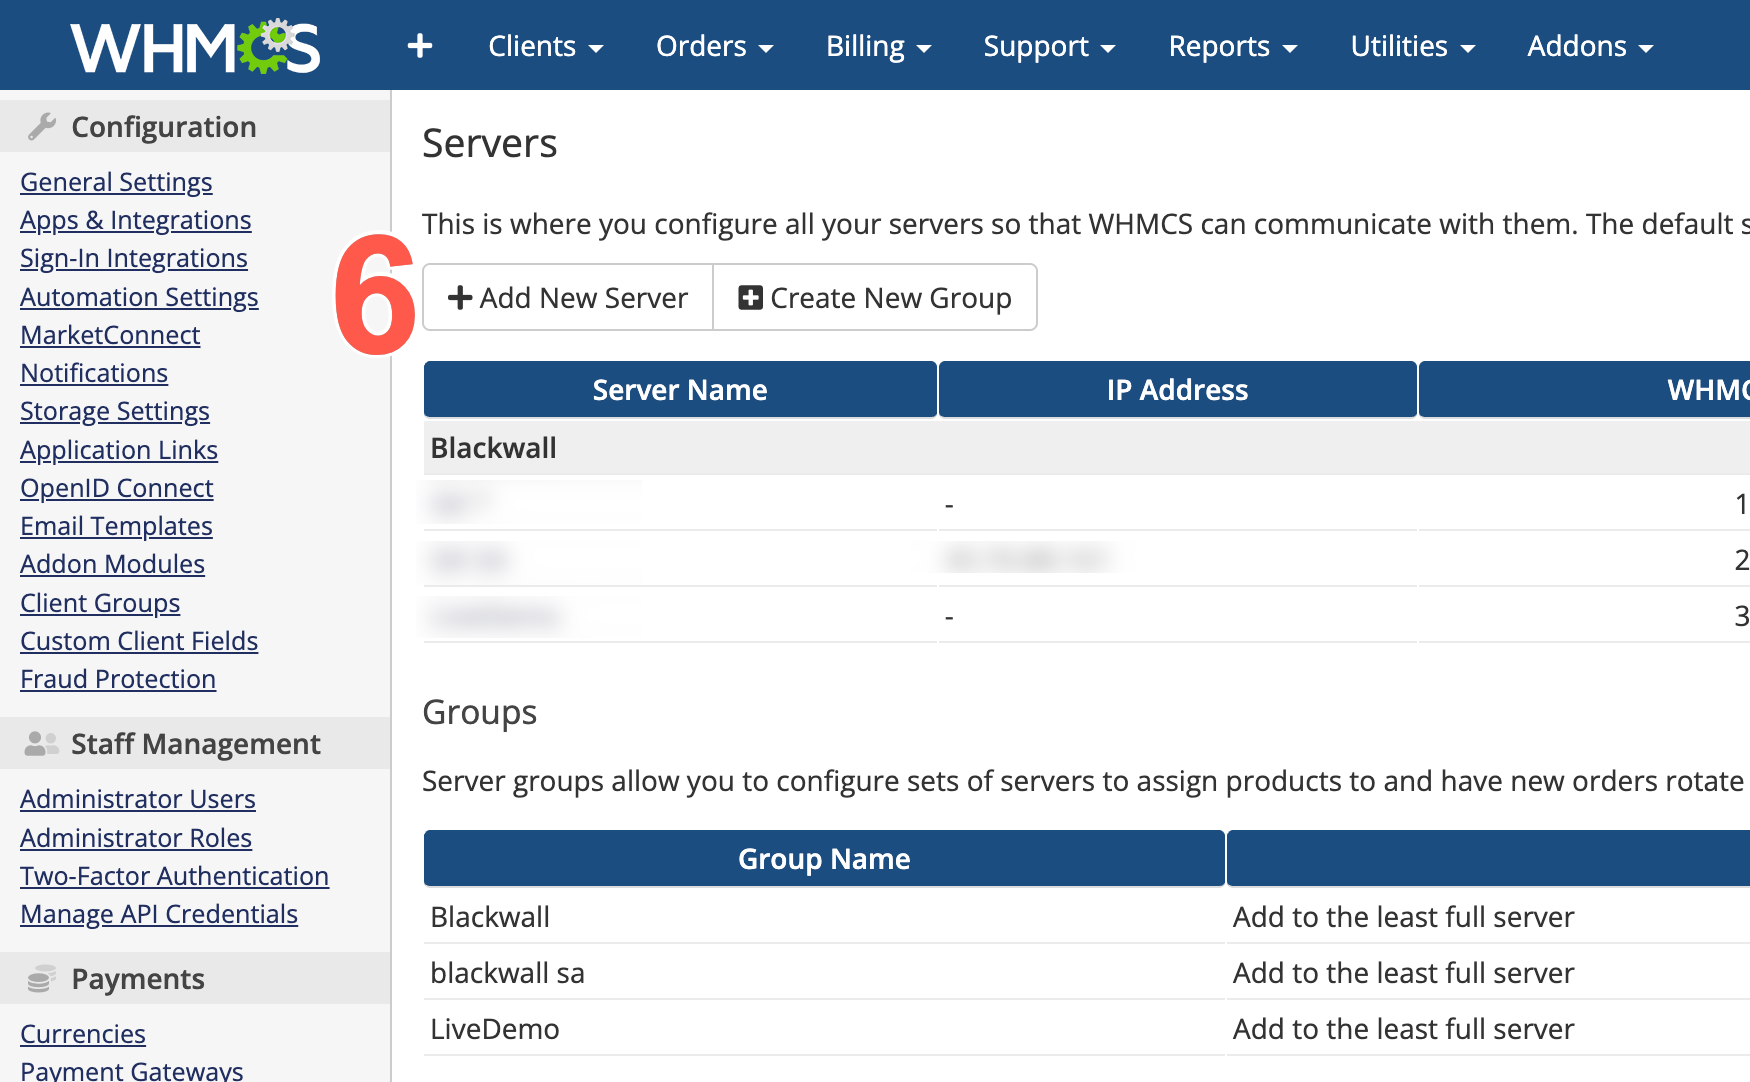
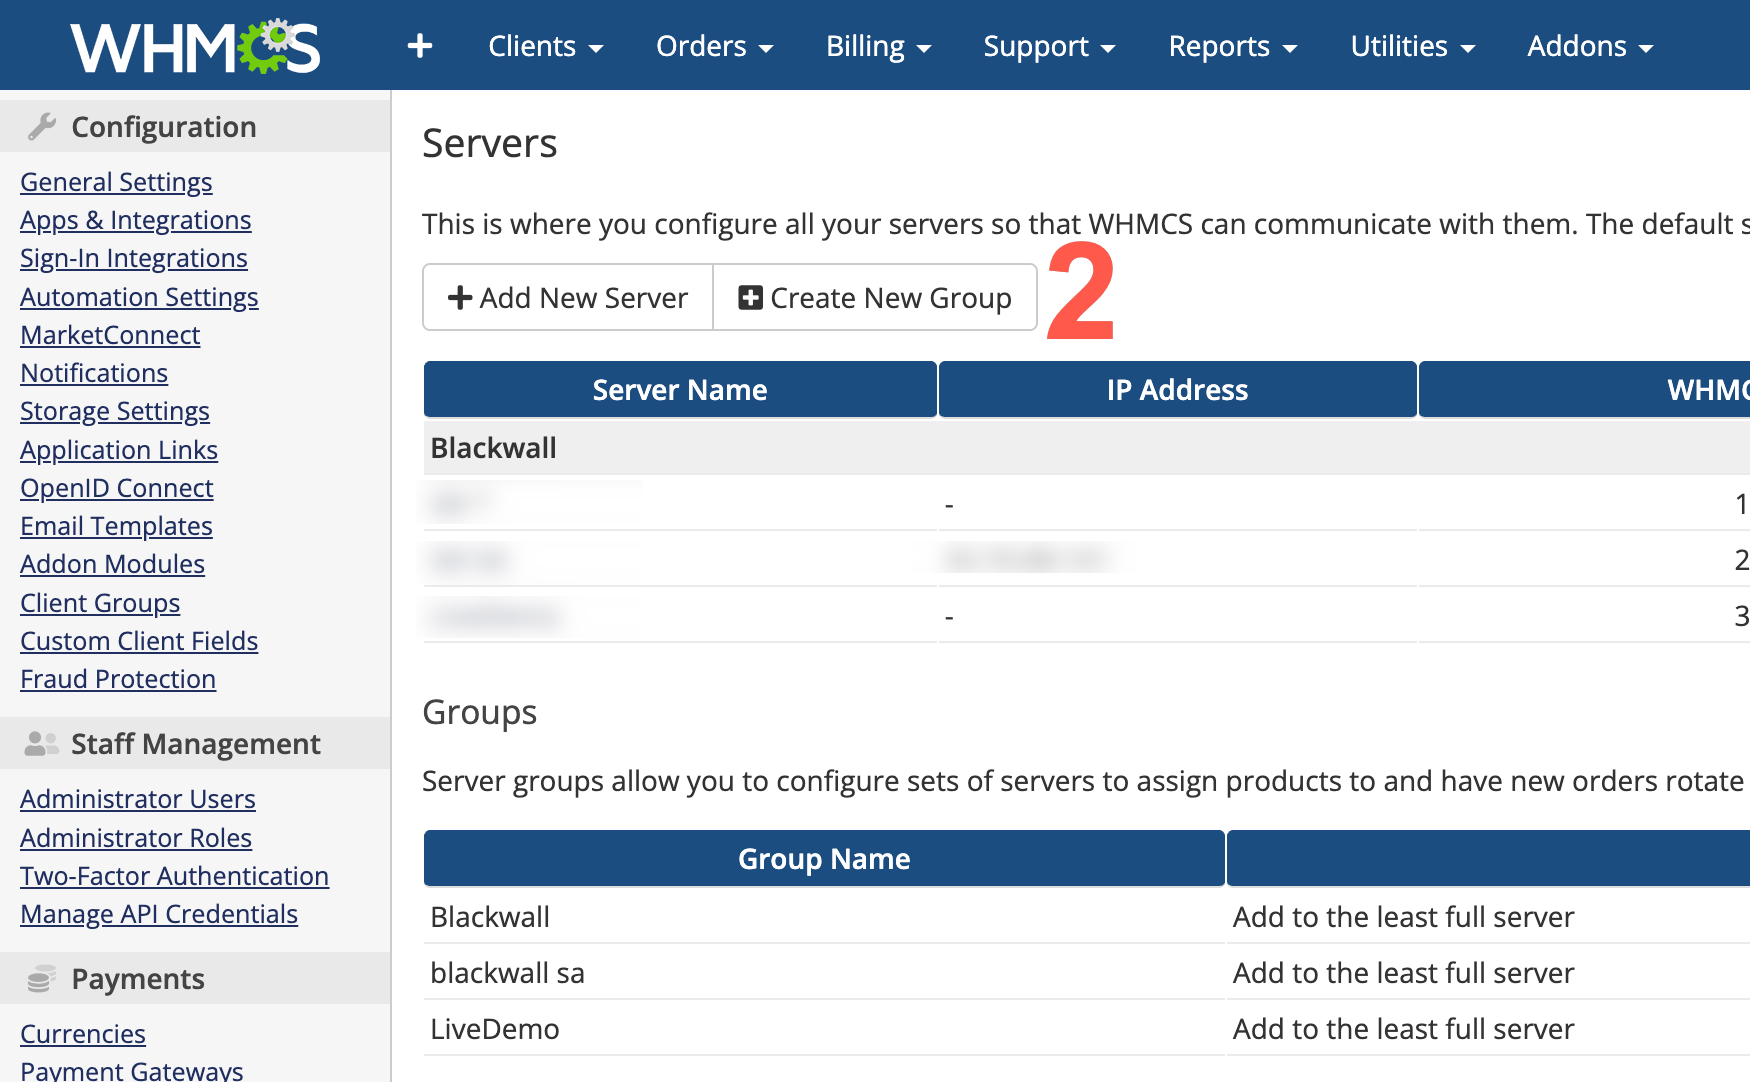
Click Add New Server.
-
On the basic server form displayed, click Go to Advanced Mode.
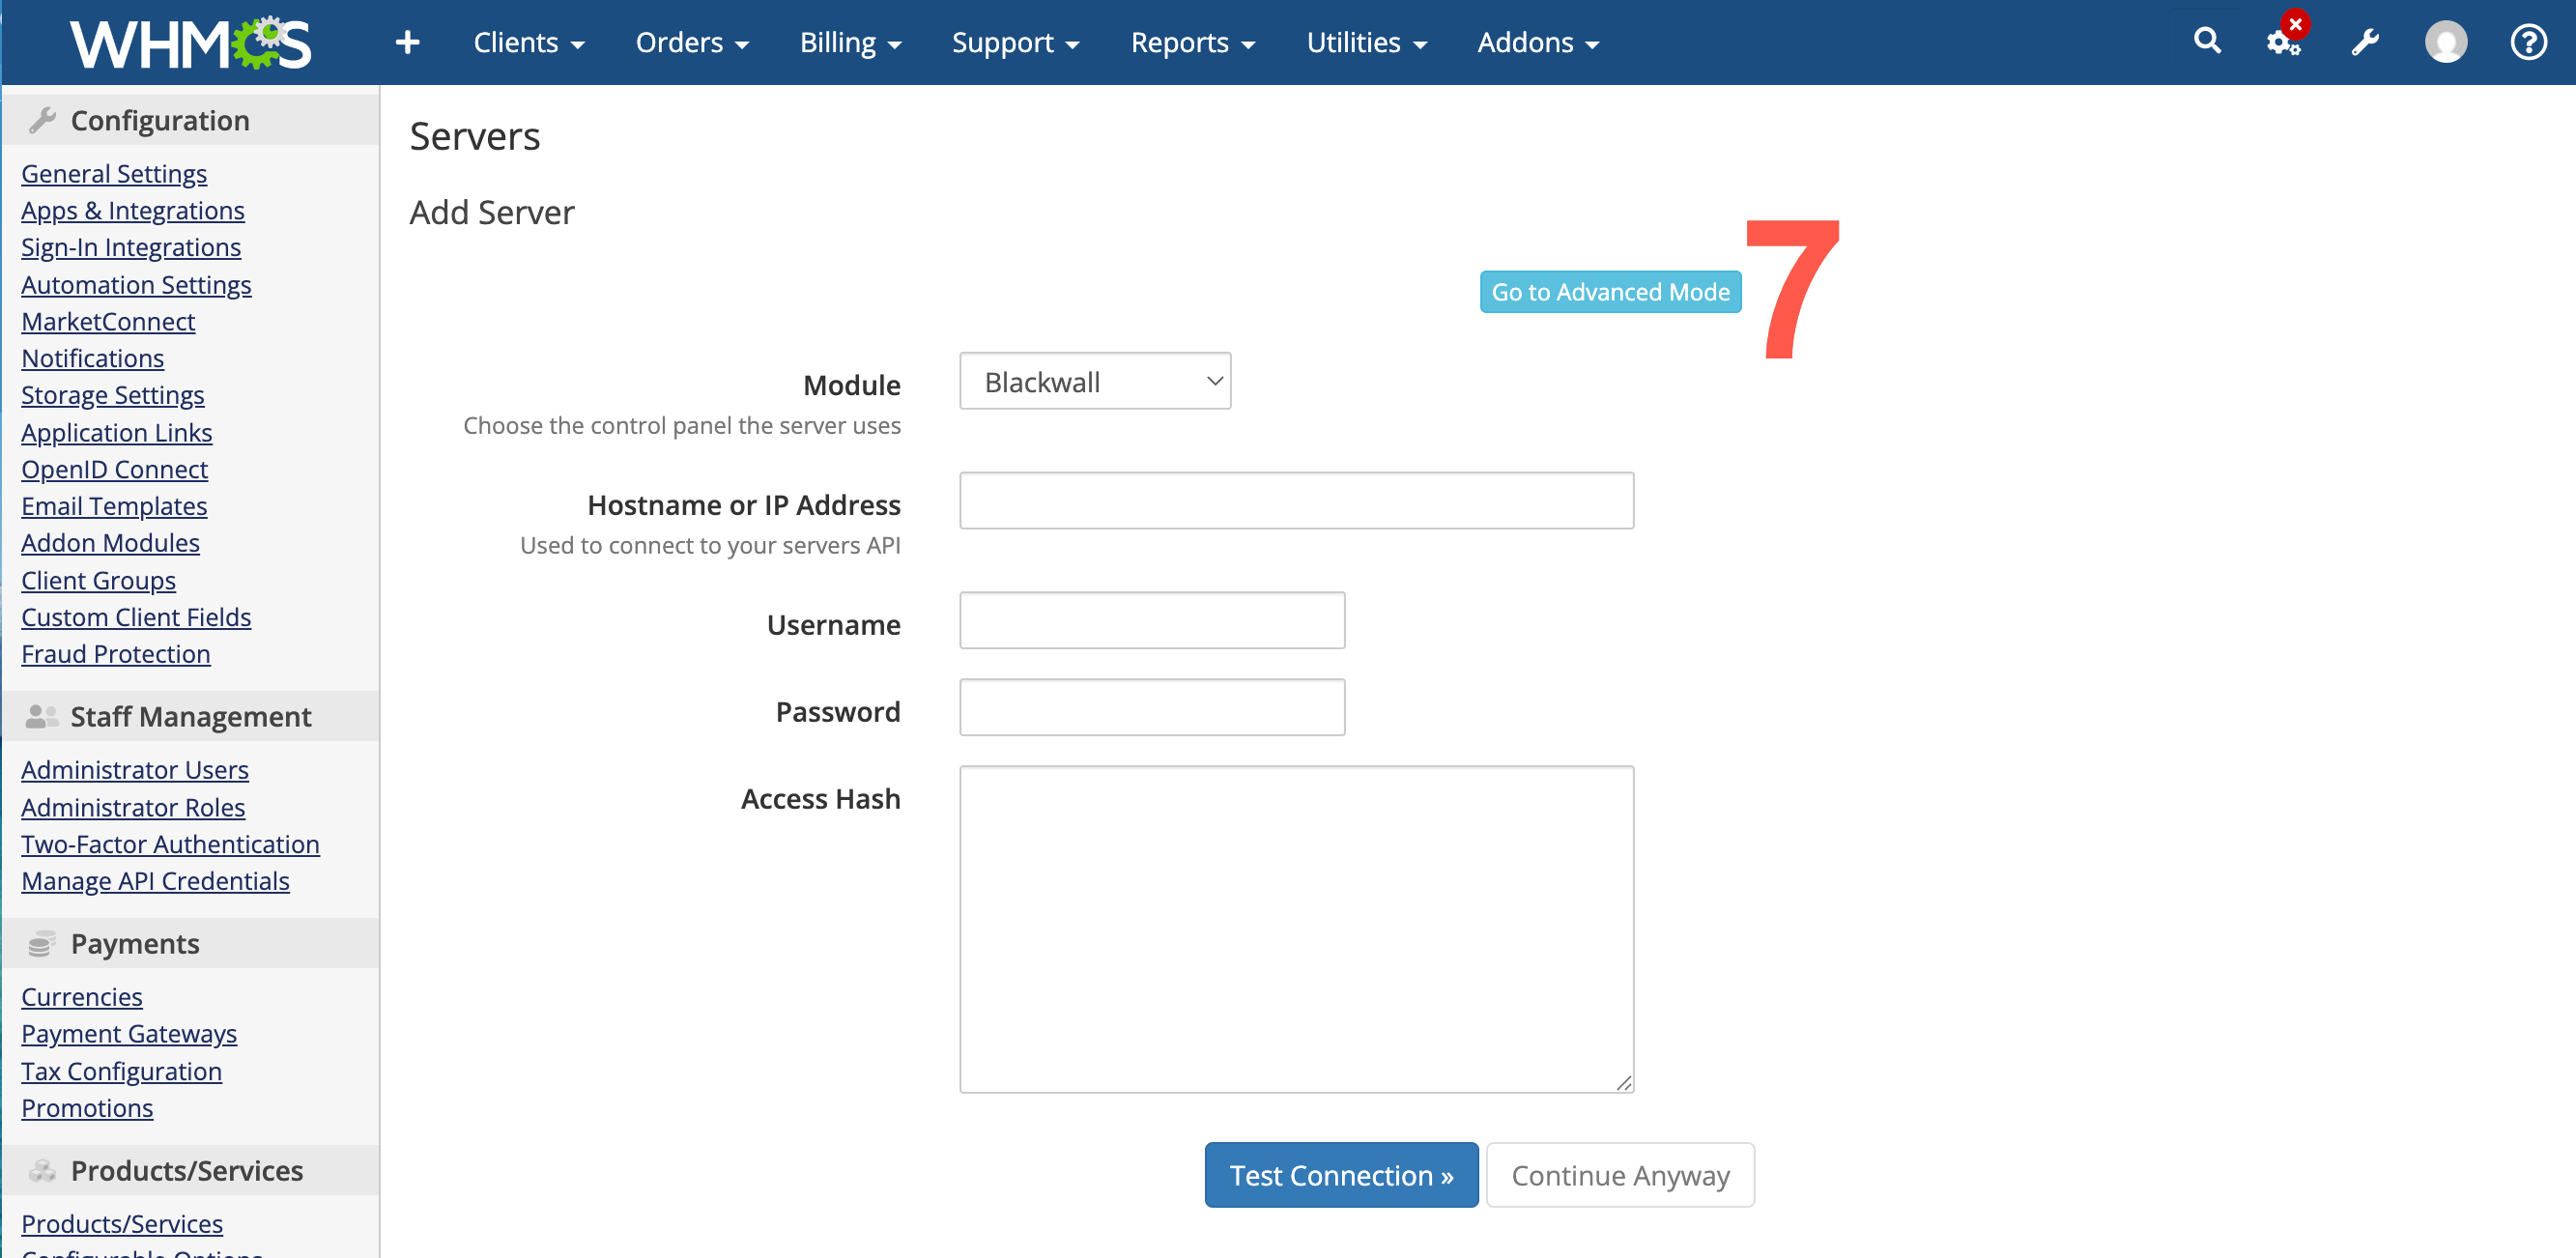
-
From the Module dropdown, select Blackwall. Irrelevant fields are hidden automatically, making configuration easier.
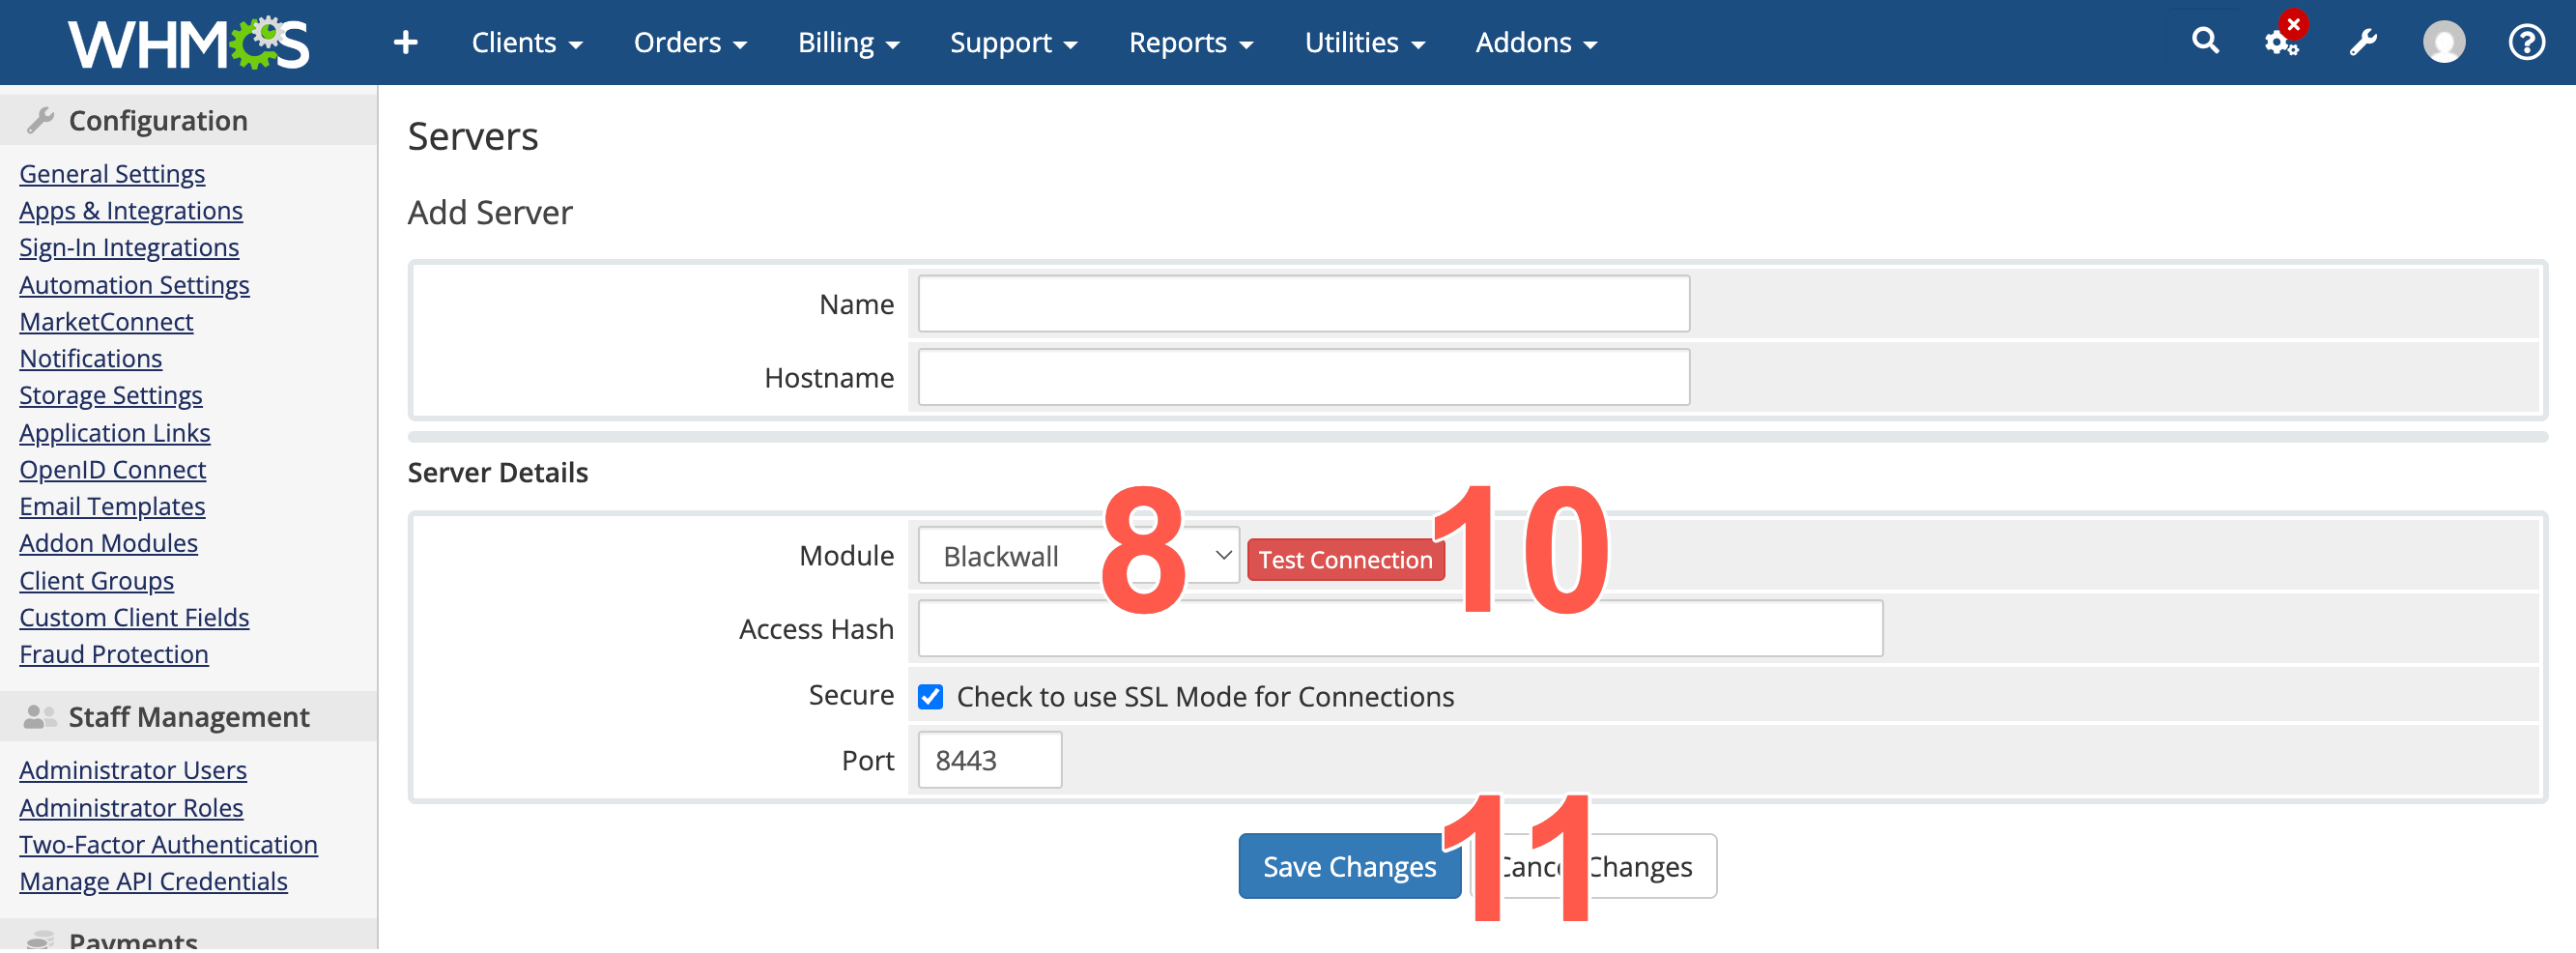
-
Populate the remaining fields:
Field Value Example Name A descriptive name for this server Blackwall EUHostname GateKeeper API hostname (without https://)**-**-**.test.blackwall.comPort GateKeeper API port (pre-filled with 8443)8443Secure Must be checked for HTTPS ☑️ API Key Your GateKeeper API key (UUID) ********-****-****-****-************ -
Click Test Connection to verify that the credentials entered are correct. If the information entered in the previous steps is correct, a success message displays.
- Click Save Changes once you have seen the success message.
Create a WHMCS Server Group
- Repeat steps 1-5 of the previous section.
-
Click Create New Group.
 .
. -
Enter a meaningful name for your new group in the Name field.
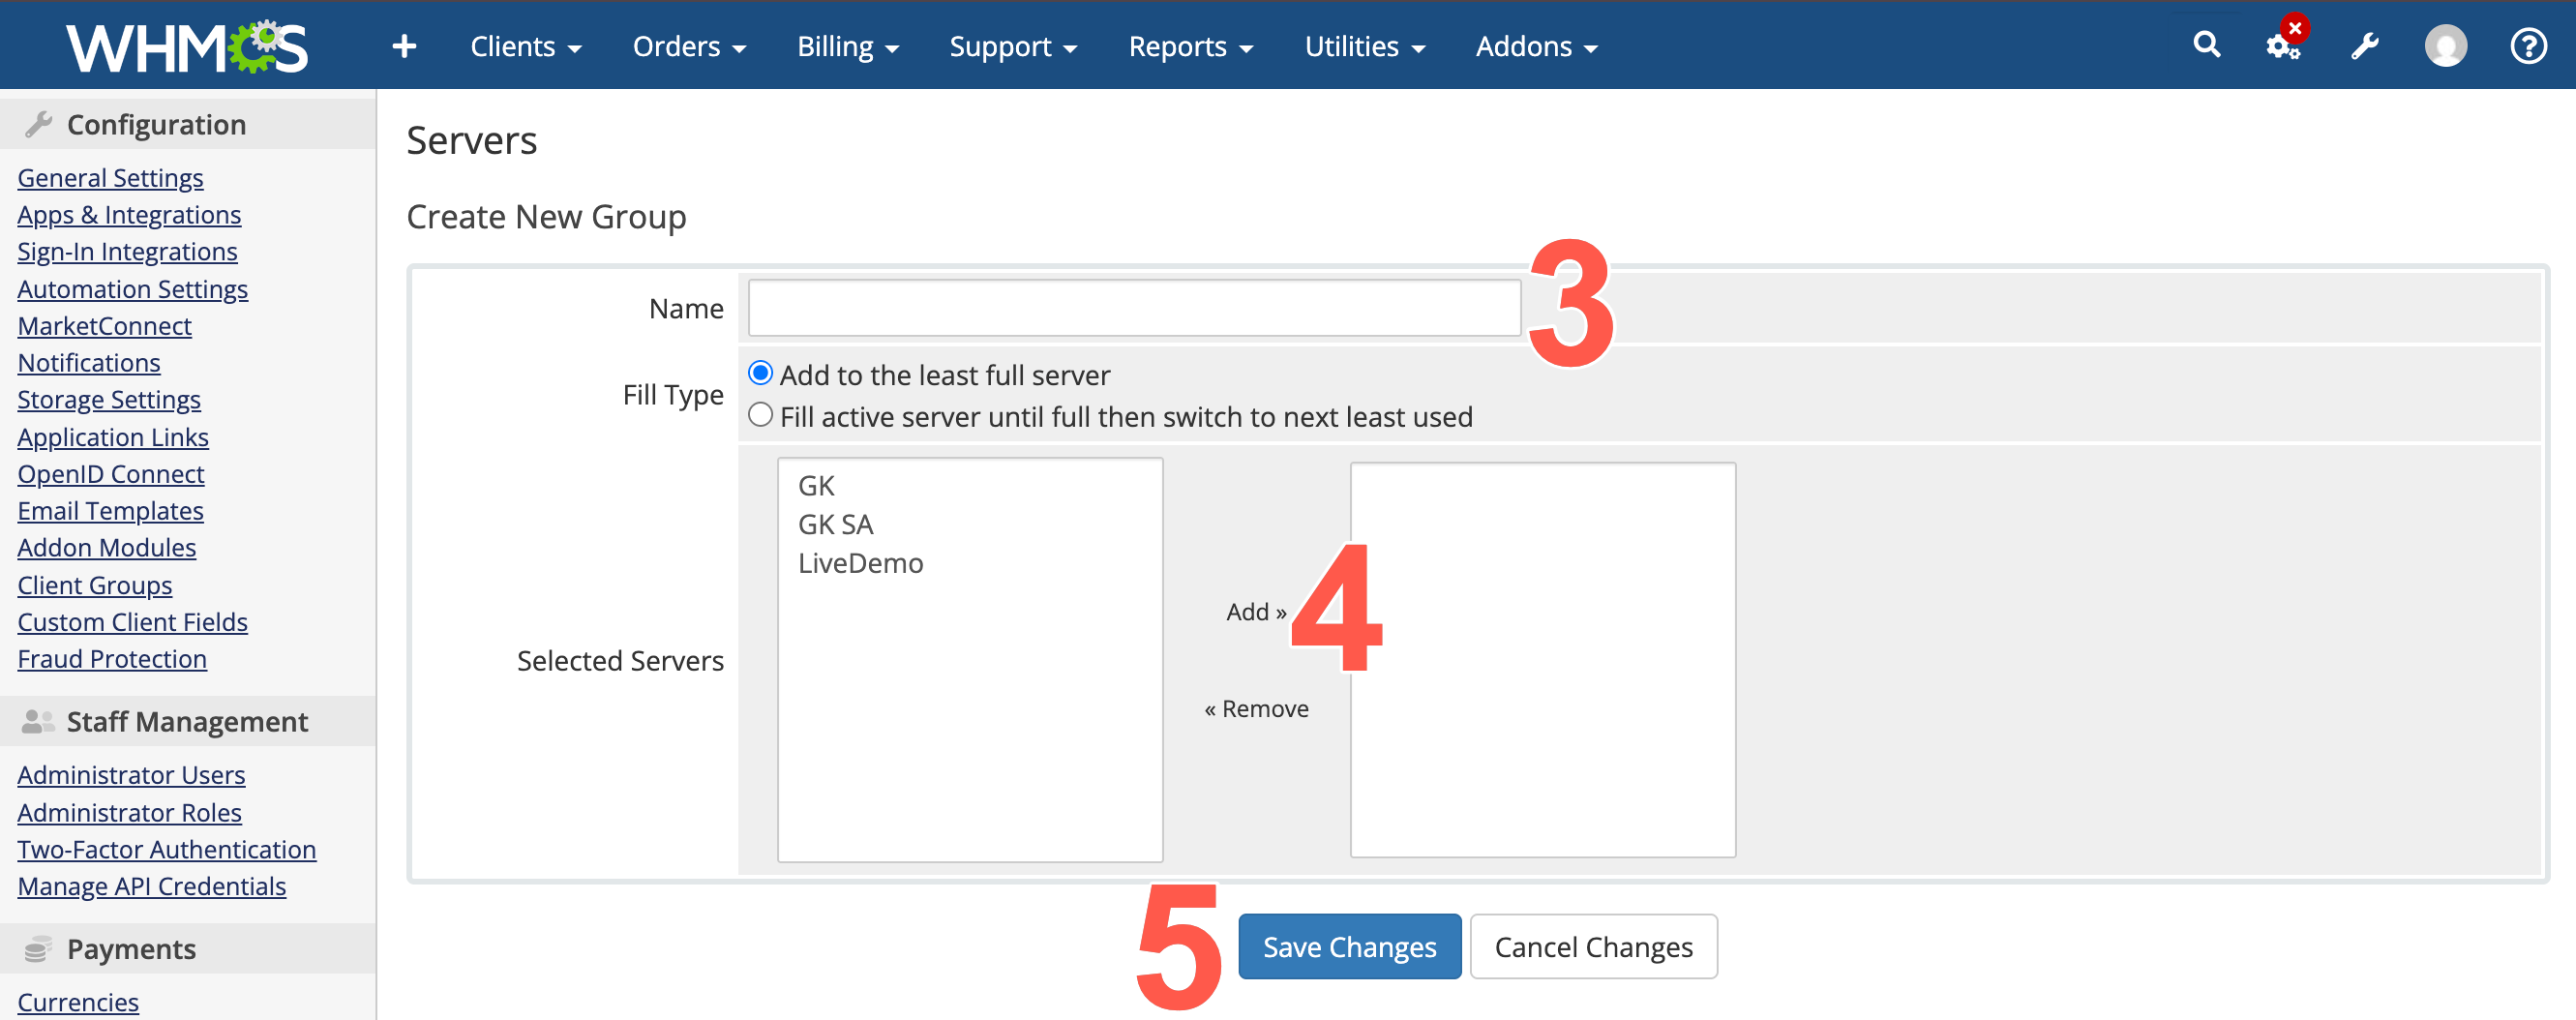
- Select your new Blackwall server from the left list panel and click Add to move it to the right list panel. This effectively adds the server to your new group. You can remove a server again by clicking it in the right-hand list panel and clicking Remove, which effectively removes the server from your new group. For this plugin, only one server (GateKeeper instance) should be associated with any server group.
- Click Save Changes.
Create a WHMCS Product Group
Before creating a product, create a WHMCS Product Group to organise the product in the WHMCS order form.
-
- Log in to your WHMCS account using your login credentials.
- Once your account homepage loads, from the top-right corner of the WHMCS admin panel, click .
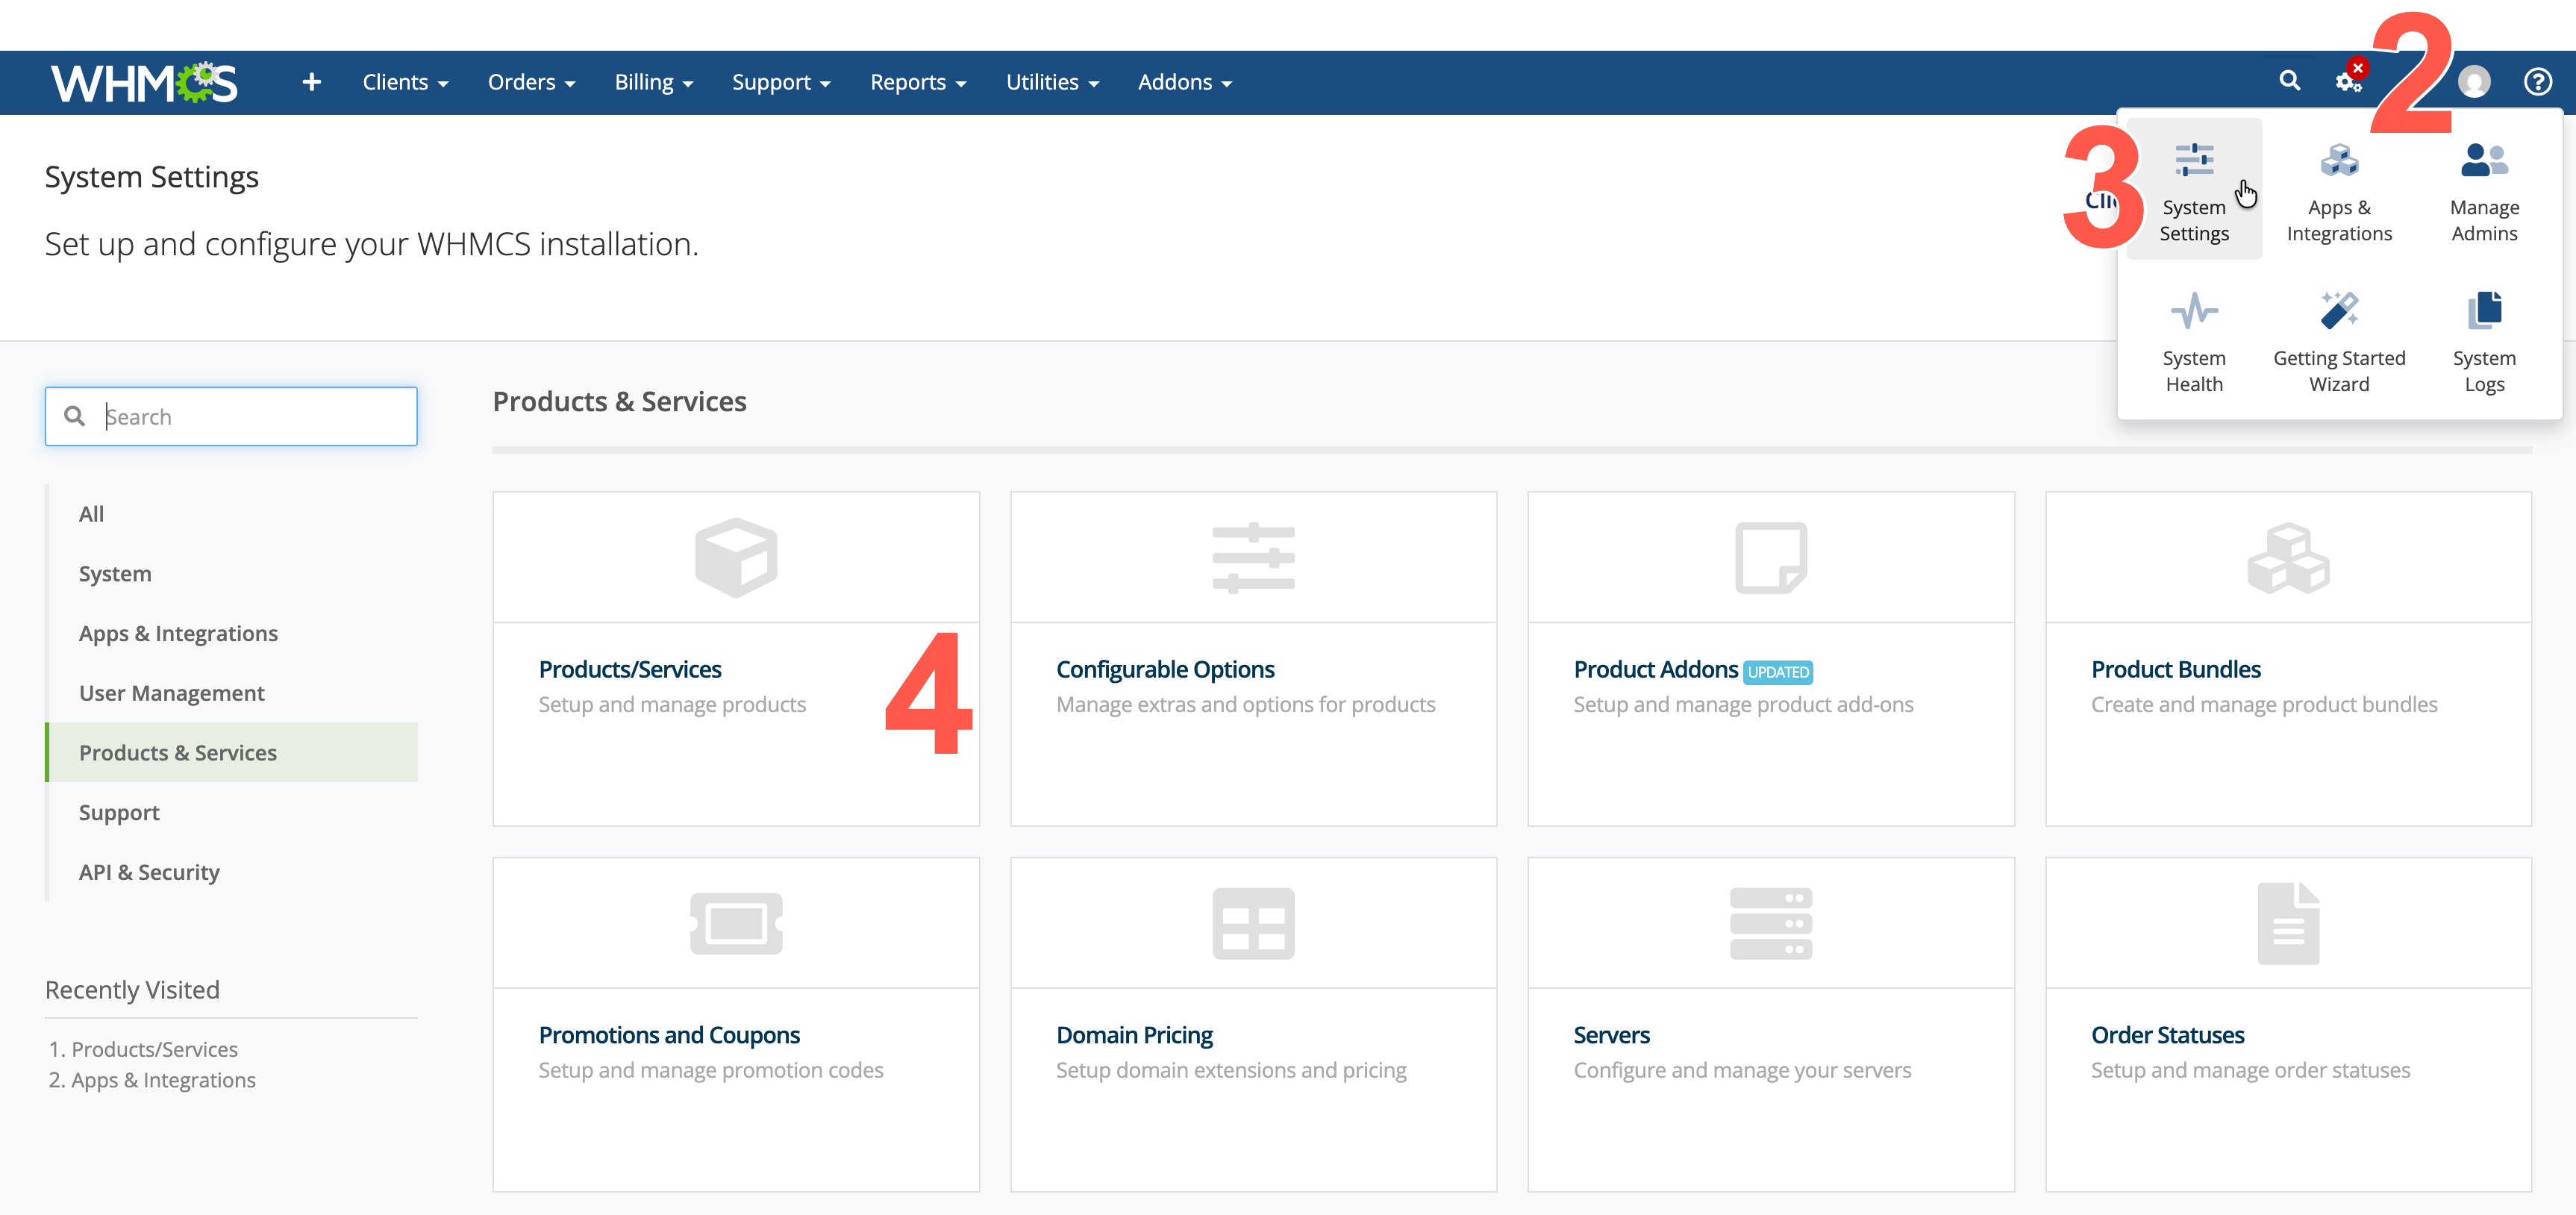
- From the dropdown menu displayed, click System Settings.
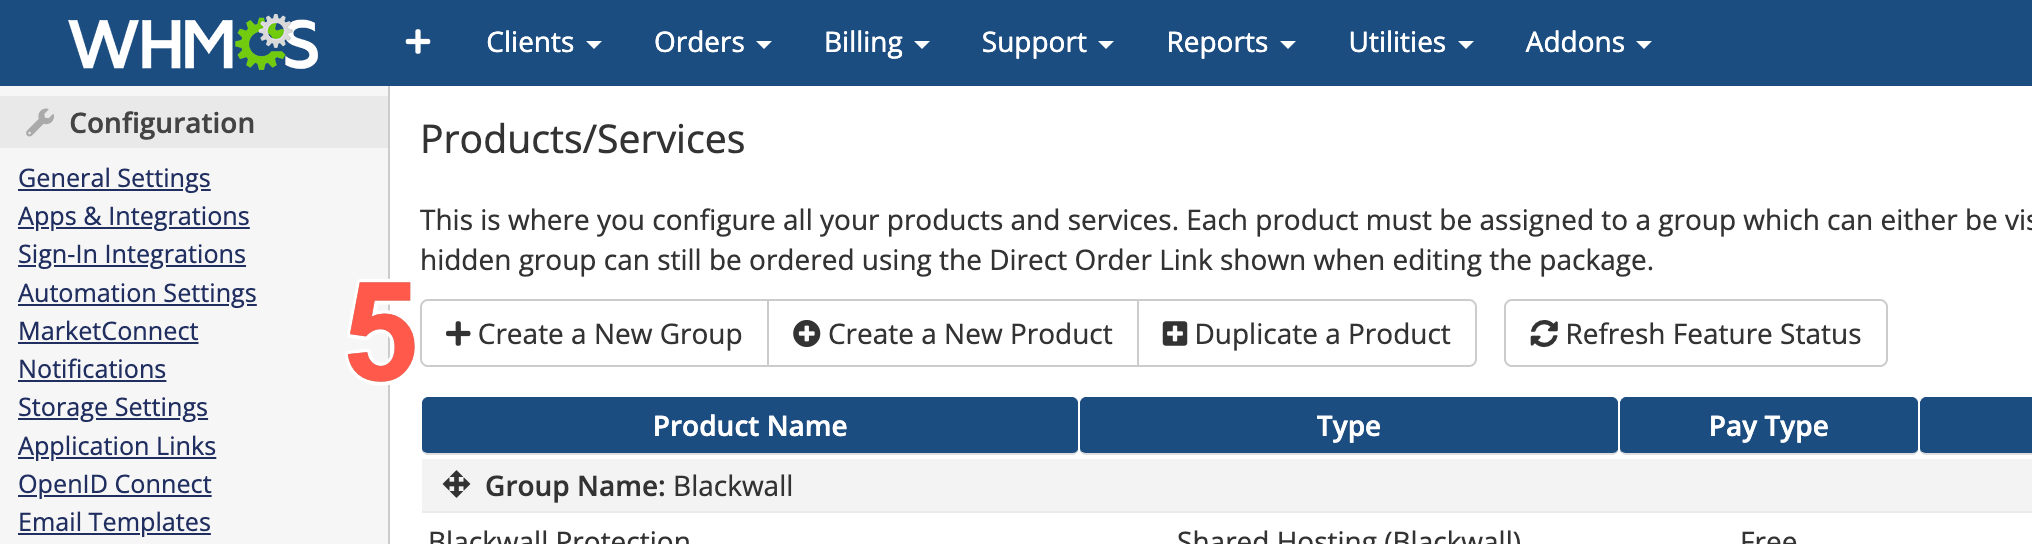
- From the widgets displayed, click Products/Services.
- When the Products/Services page displays, click + Create a New Group.
-
Populate the Create Group page fields as follows:
-
In Product Group Name, enter a meaningful name for the group. For example:
Blackwall -
In the URL field, enter the friendly URL slug for the product group. For example:
blackwall -
Optionally, in the Product Group Headline, enter a heading that your customers see on the order form.
- Optionally, in the Product Group Tagline, enter a short description for the product group.
- Select the required Order Form Template.
- Select the payment gateways that customers can use for products in this group.
- Select the Hidden checkbox if you do not want this product group to appear on the public WHMCS order form. This is useful while you are configuring or testing the products in the group. Hidden product groups are not displayed to customers in the order form, but administrators can still manage them in WHMCS.
- Click Save Changes.
-
Create a WHMCS Product
You can create a new product by performing the following steps, or skip this section if you want to use an existing product.
- Log in to your WHMCS account as an administrator, using your login credentials.
- Open the menu item Addons » Apps & Integration.
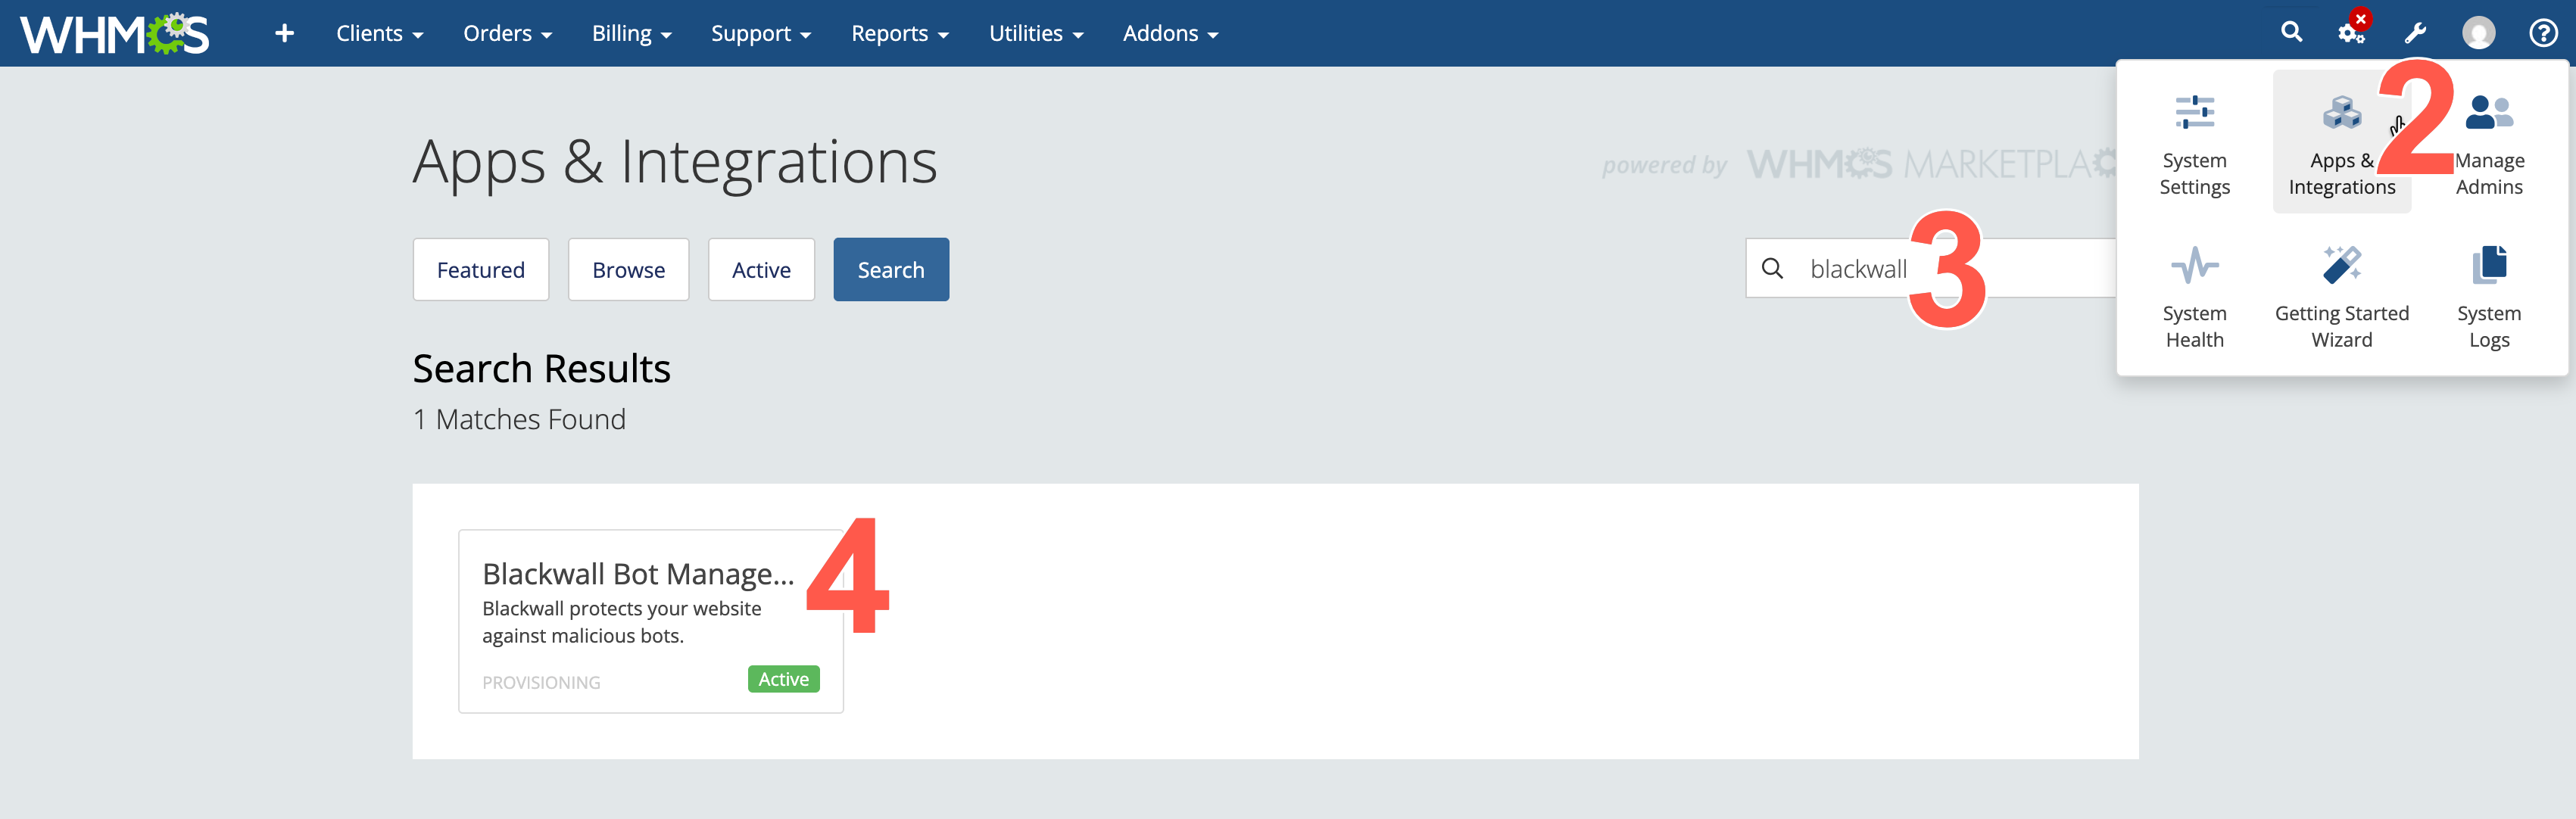
- Start typing Blackwall in the search box.
- Once autocomplete finds the Blackwall add-on module, click the Blackwall widget.
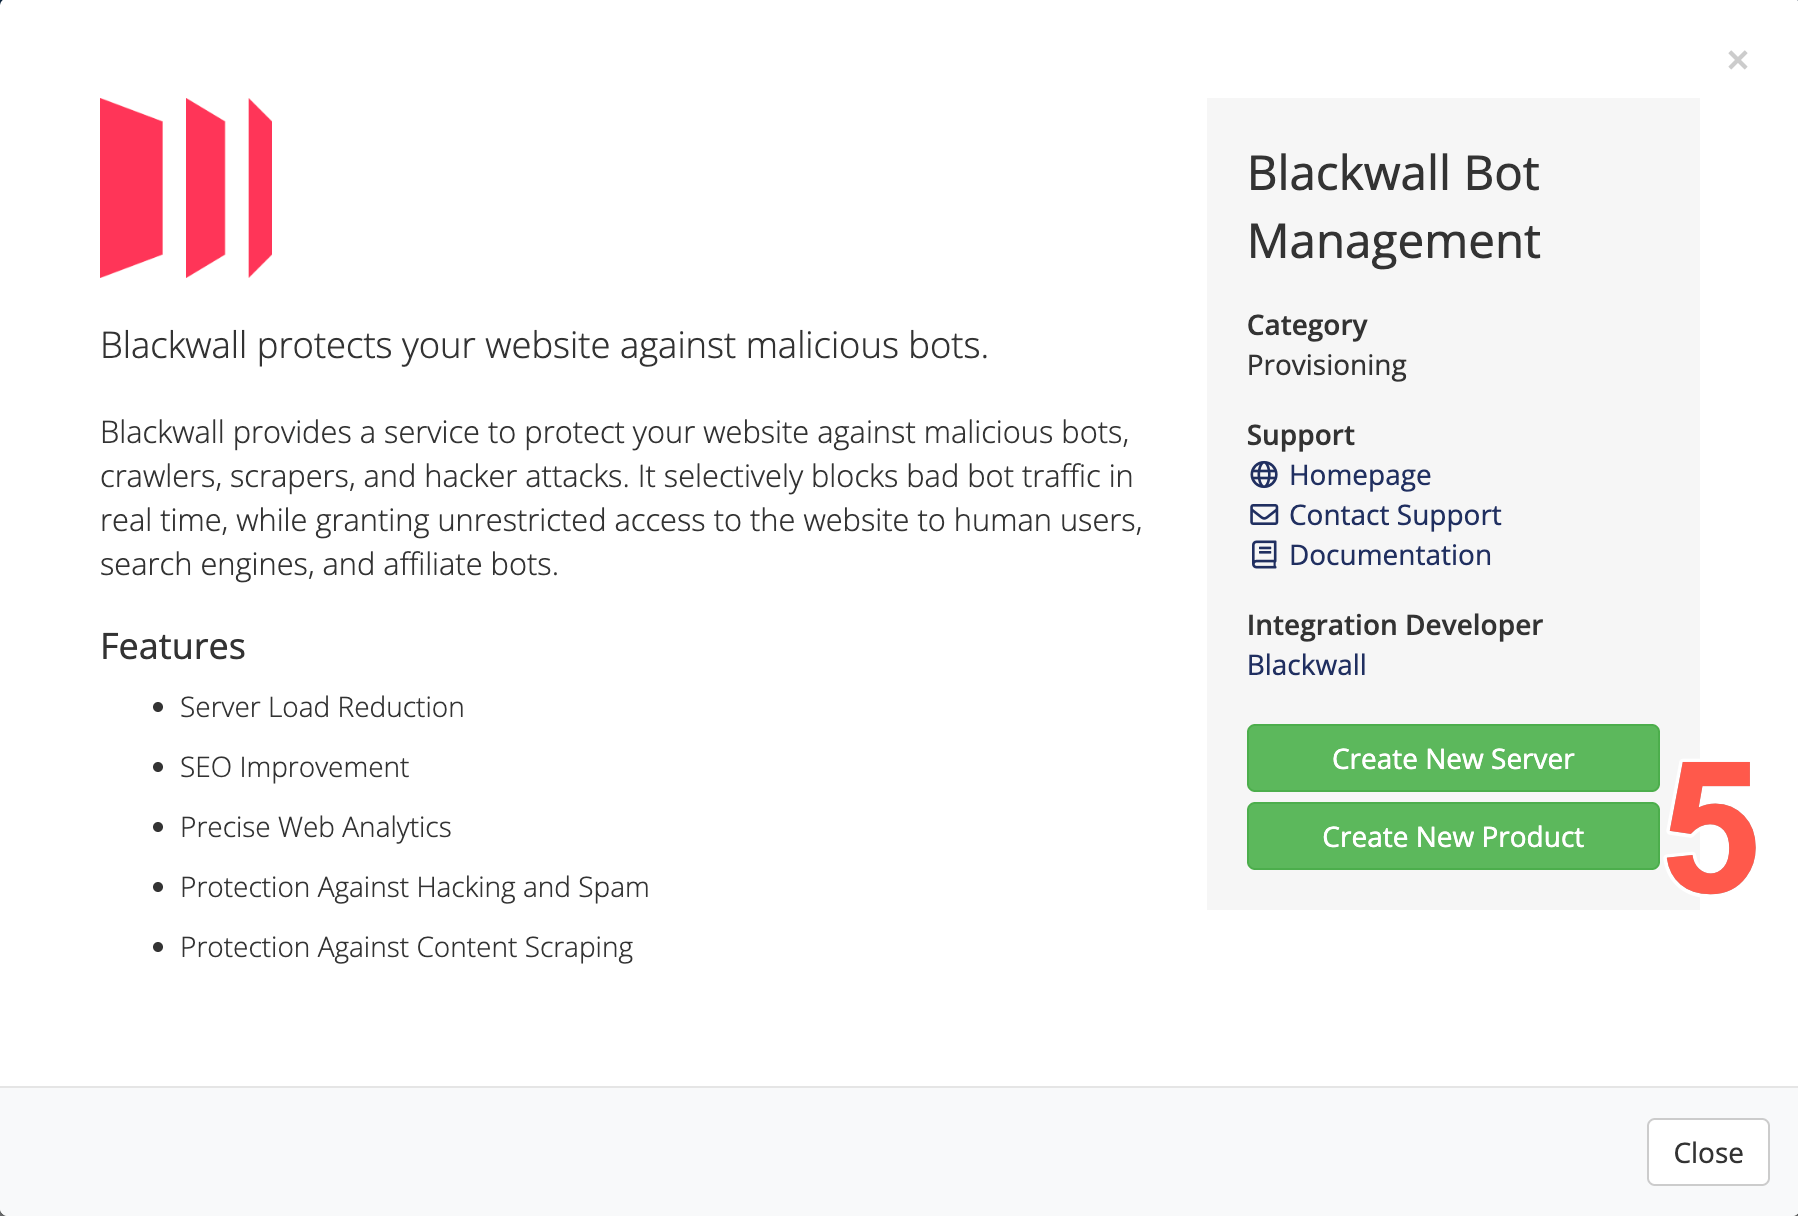
- On the page displayed, click the Create New Product button.
- On the Create a New Product page that displays, populate the following fields:
- Select the Product Type that best matches how you want WHMCS to manage your new product. For the Blackwall plugin, Shared Hosting is typically used, unless your internal setup requires another type.
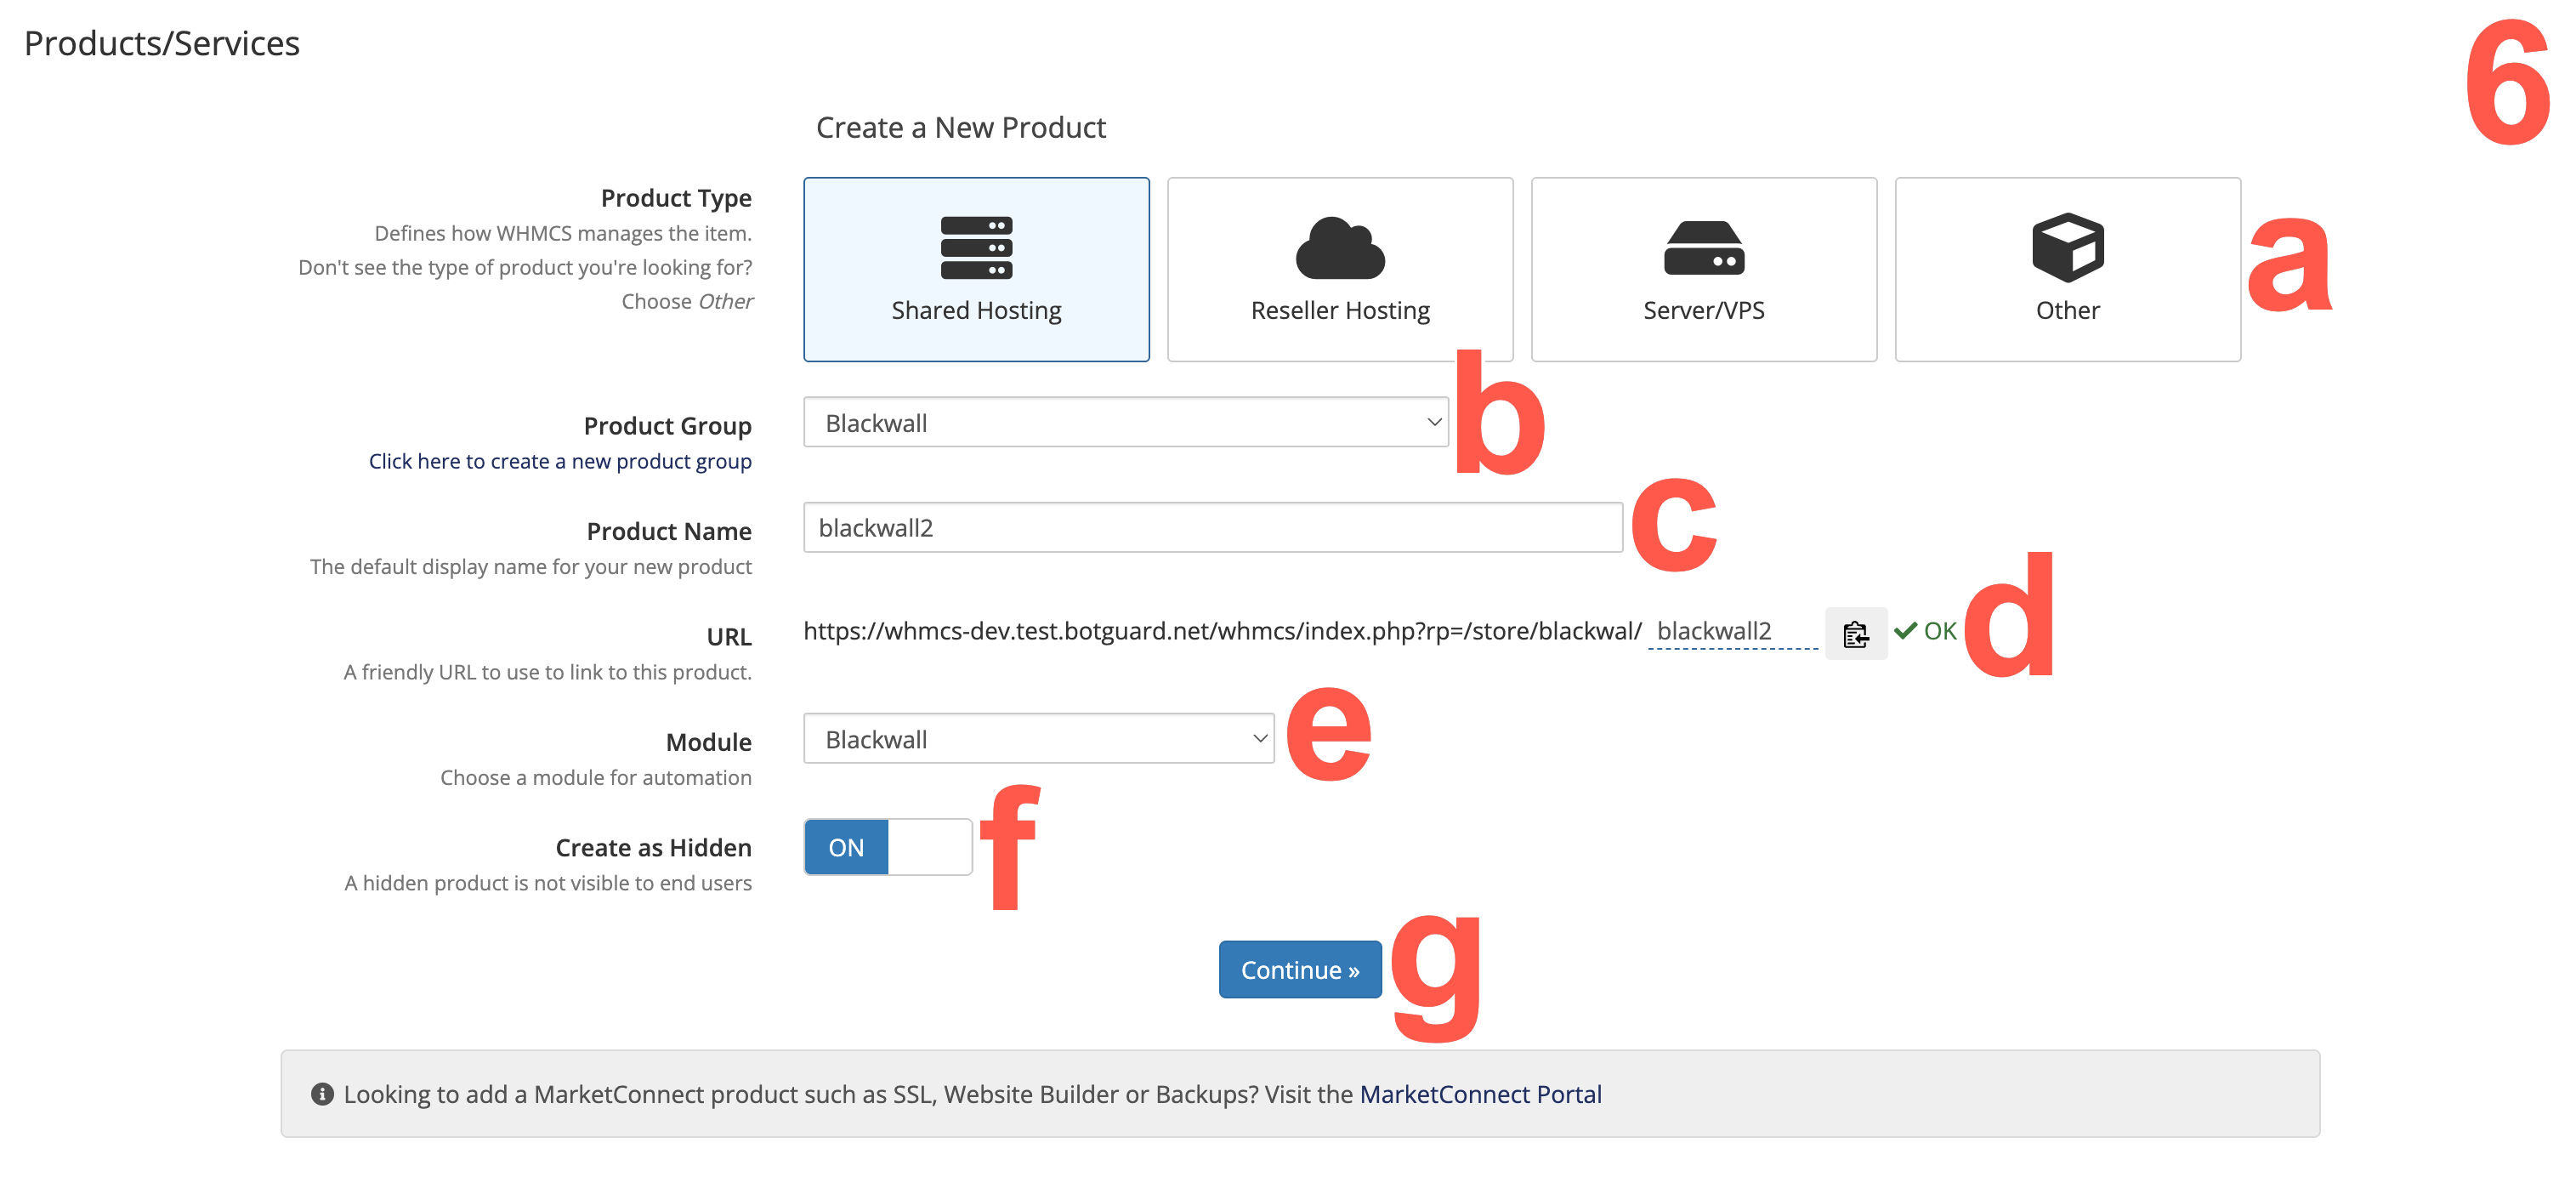
- In Product Group, select the group that should contain the product. In this example, we previously created the Product Group Blackwall.
- In Product Name, enter the customer-facing name of the product. This is the name that appears in WHMCS order forms, invoices, and client-area product lists.
- Review the automatically generated URL, which is based on the selected product group and product name. Use this friendly URL to link to this product.
- In Module, select the required provisioning module. If the product does not need automated provisioning during setup, leave this as No Module.
- Toggle the Create as Hidden switch to ON if you do not want customers to see the product in the public order form yet. This is recommended while you are configuring or testing the product.
- Click Continue.
- Select the Product Type that best matches how you want WHMCS to manage your new product. For the Blackwall plugin, Shared Hosting is typically used, unless your internal setup requires another type.
Assign the Server Group to the product
- Log in to your WHMCS account using your login credentials.
- From the left sidebar, click Products/Services.
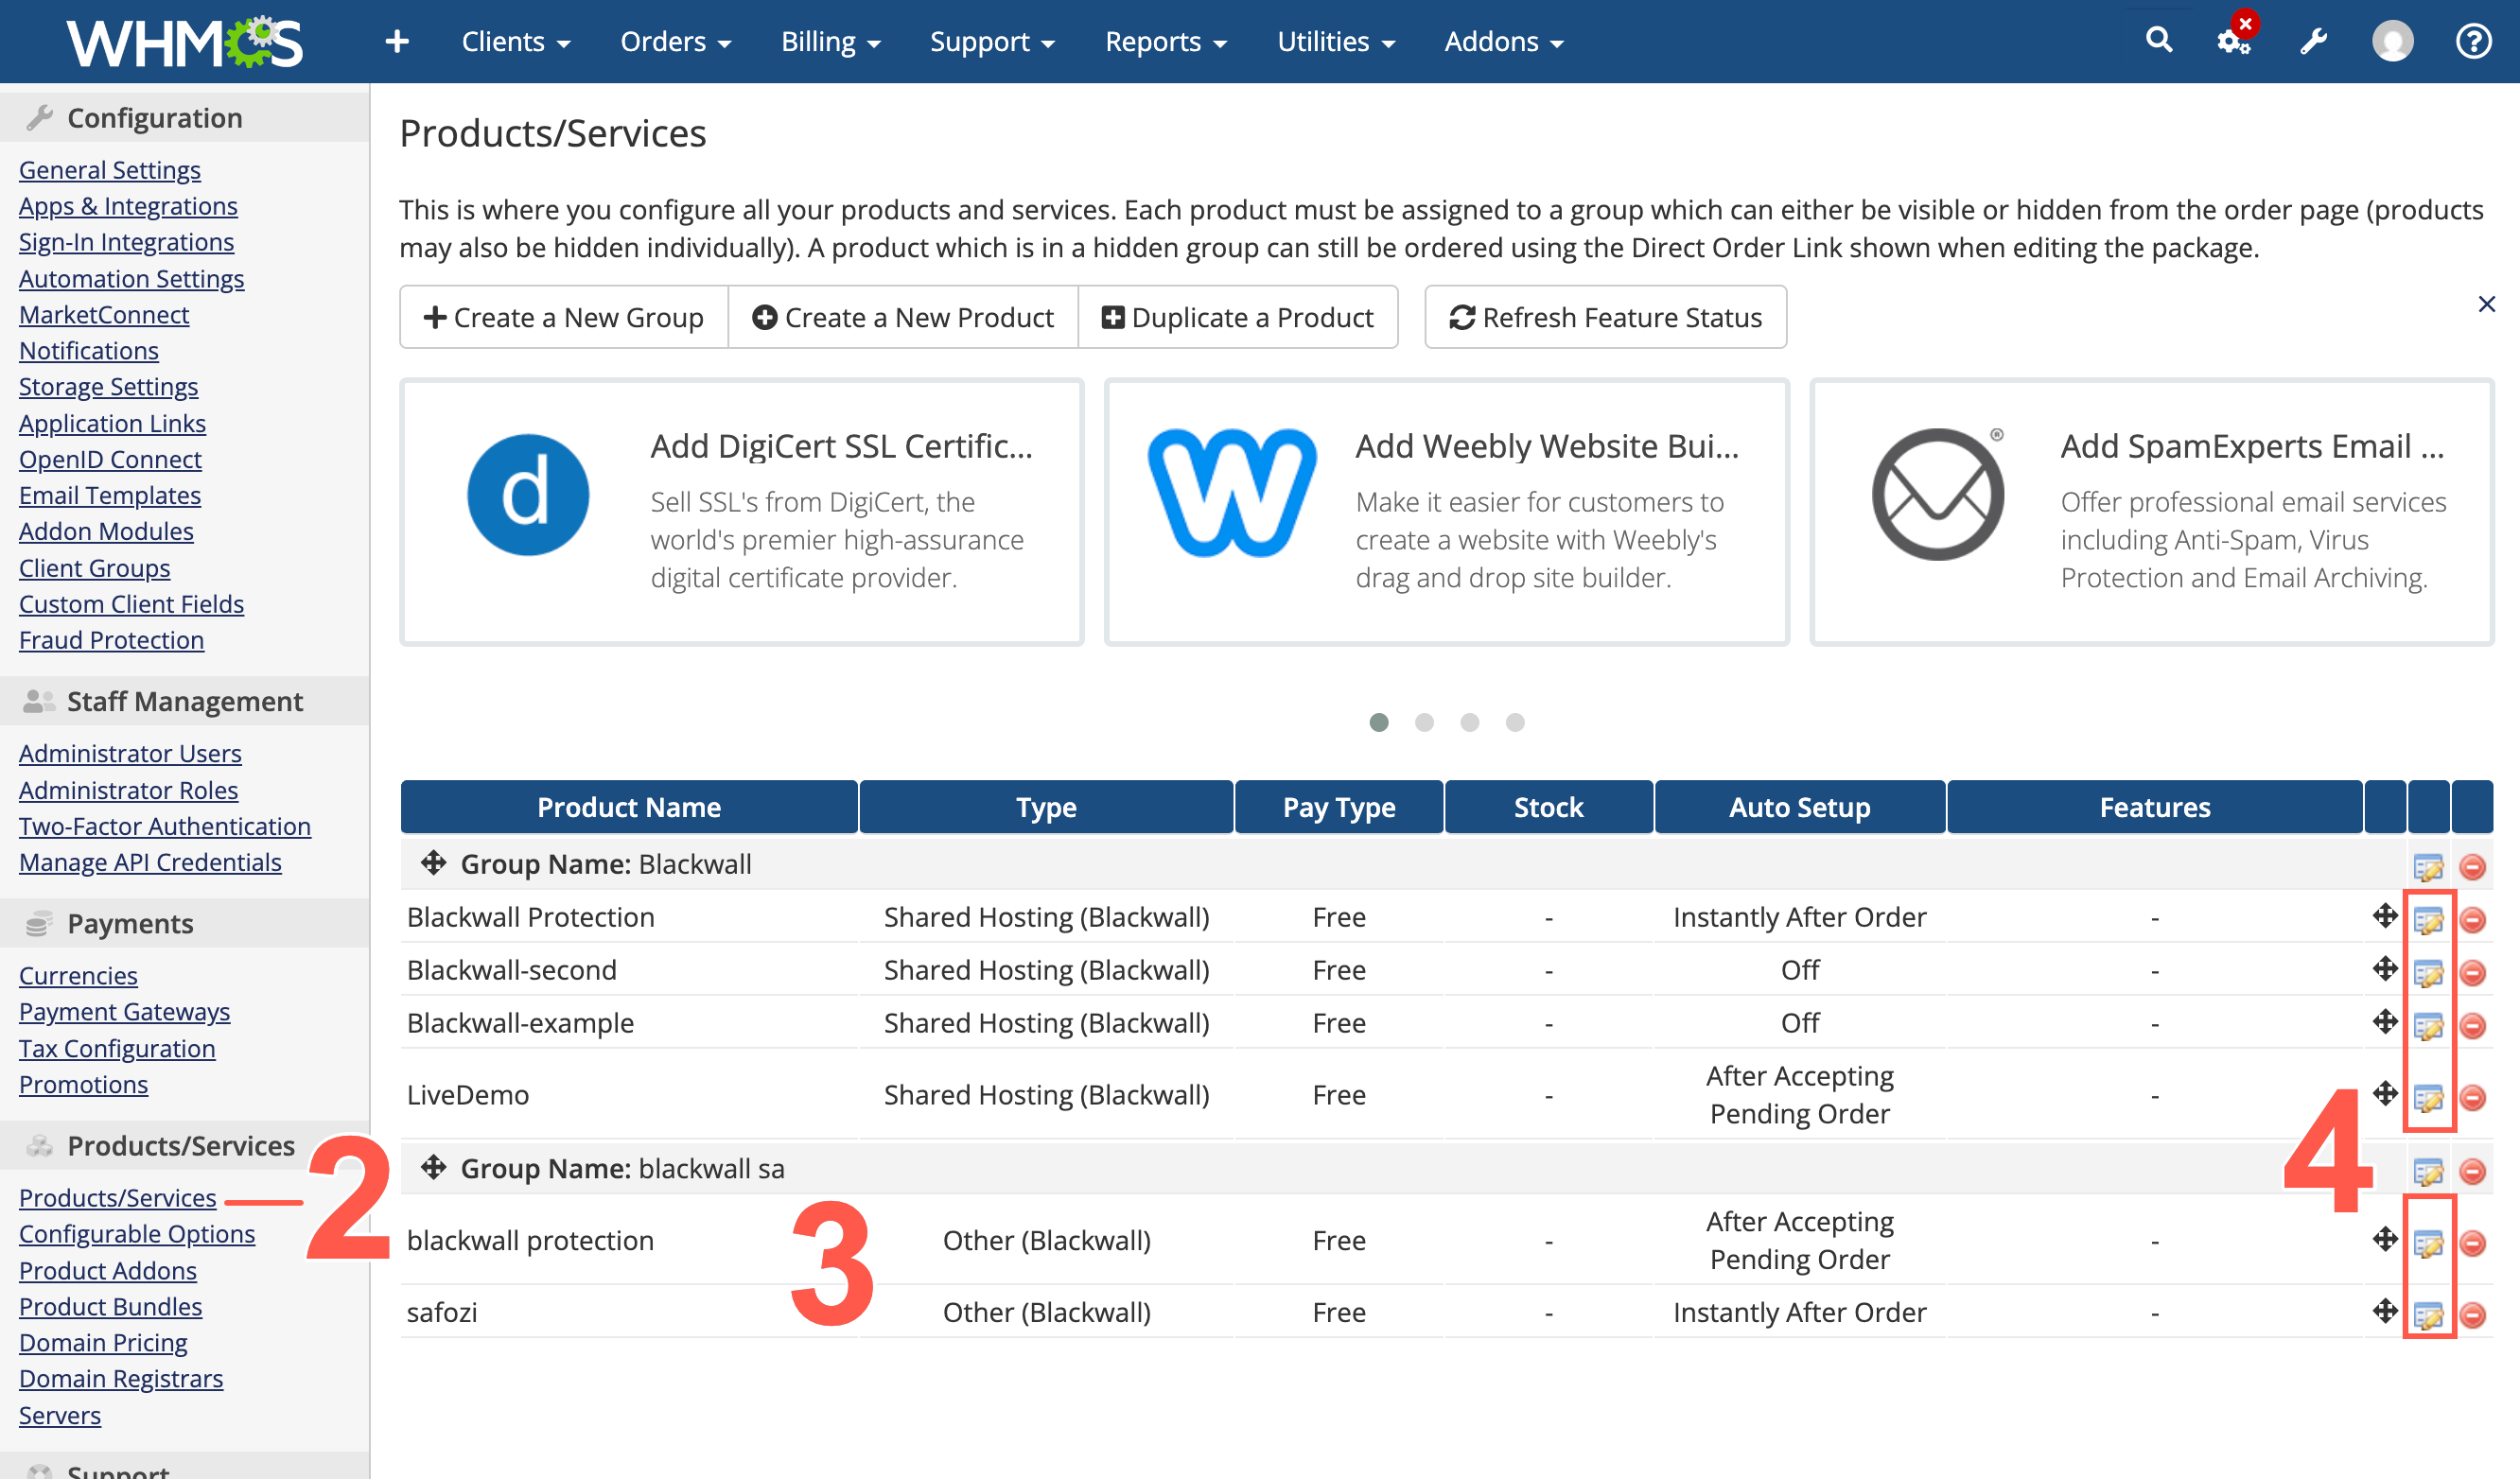
- Locate the product or service that you want to edit. If you do not wish to use an existing product, refer to Create a new product (optional).
- Click the edit icon for the product or service that you want to configure.
- On the page that displays, click the Module Settings tab.
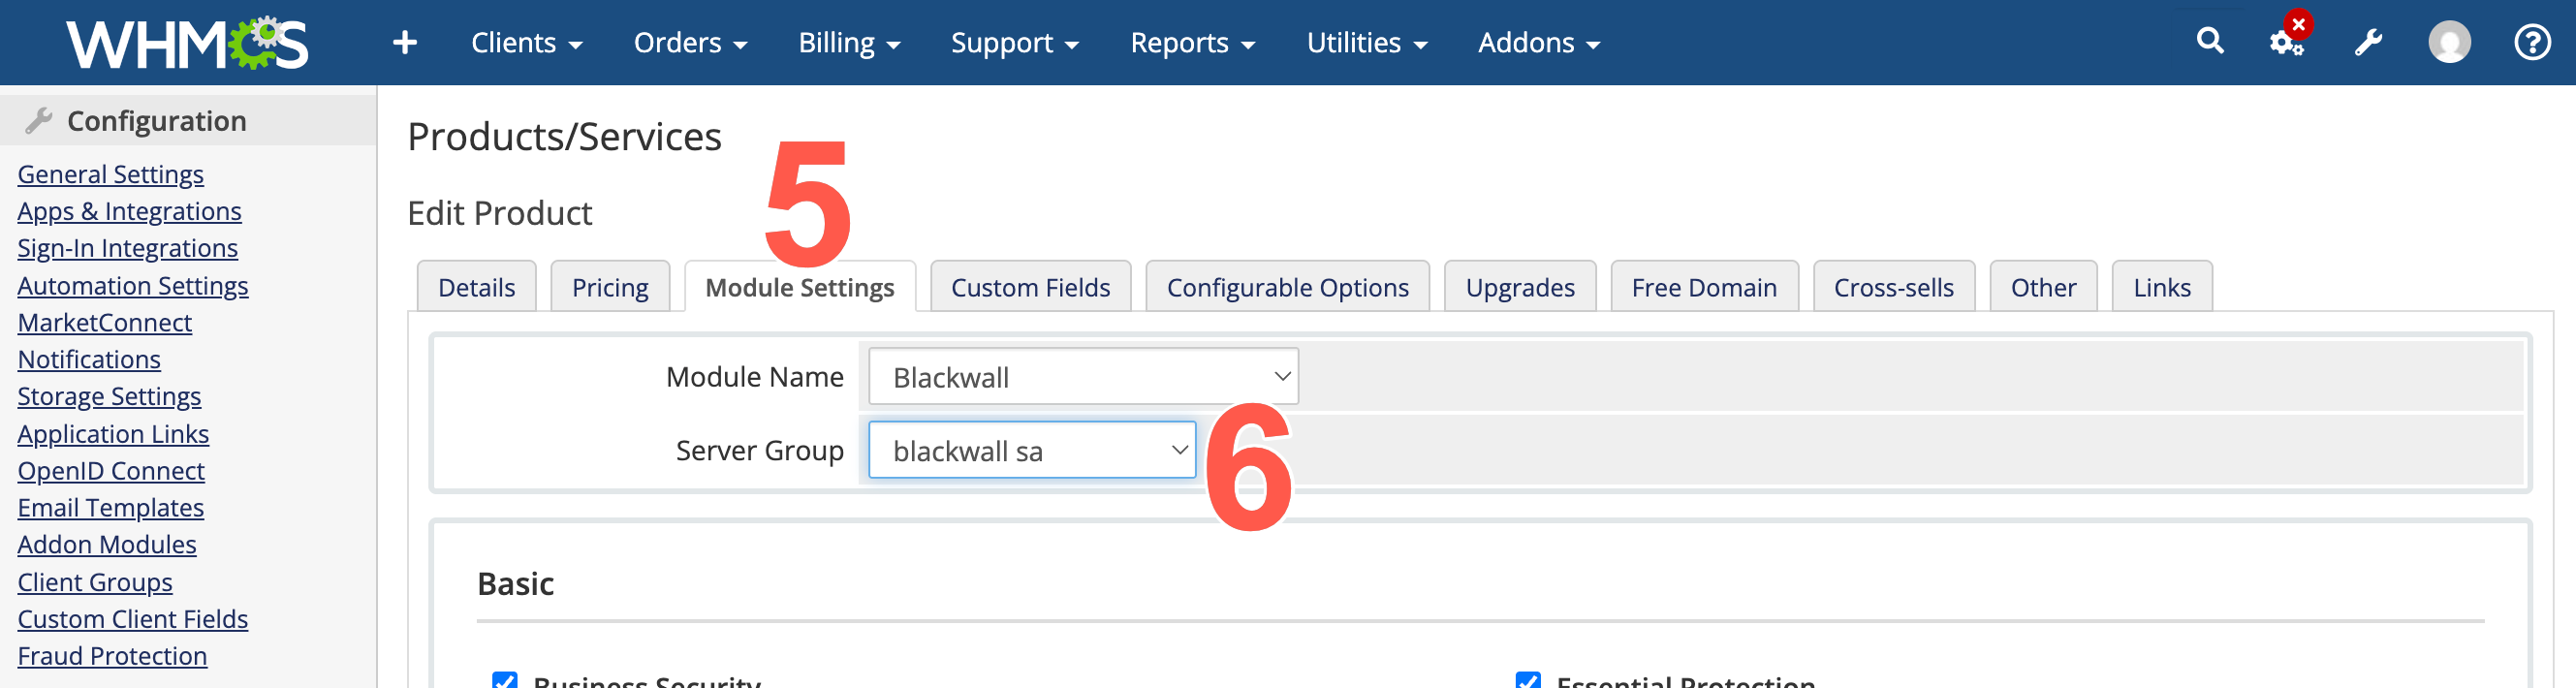
- From the Server Group dropdown menu, select the new server group that you created.
- Click Save Changes.
- Choose the components that you want to use in this product:
- After saving changes in the previous step, various component options display on the Module Settings page.
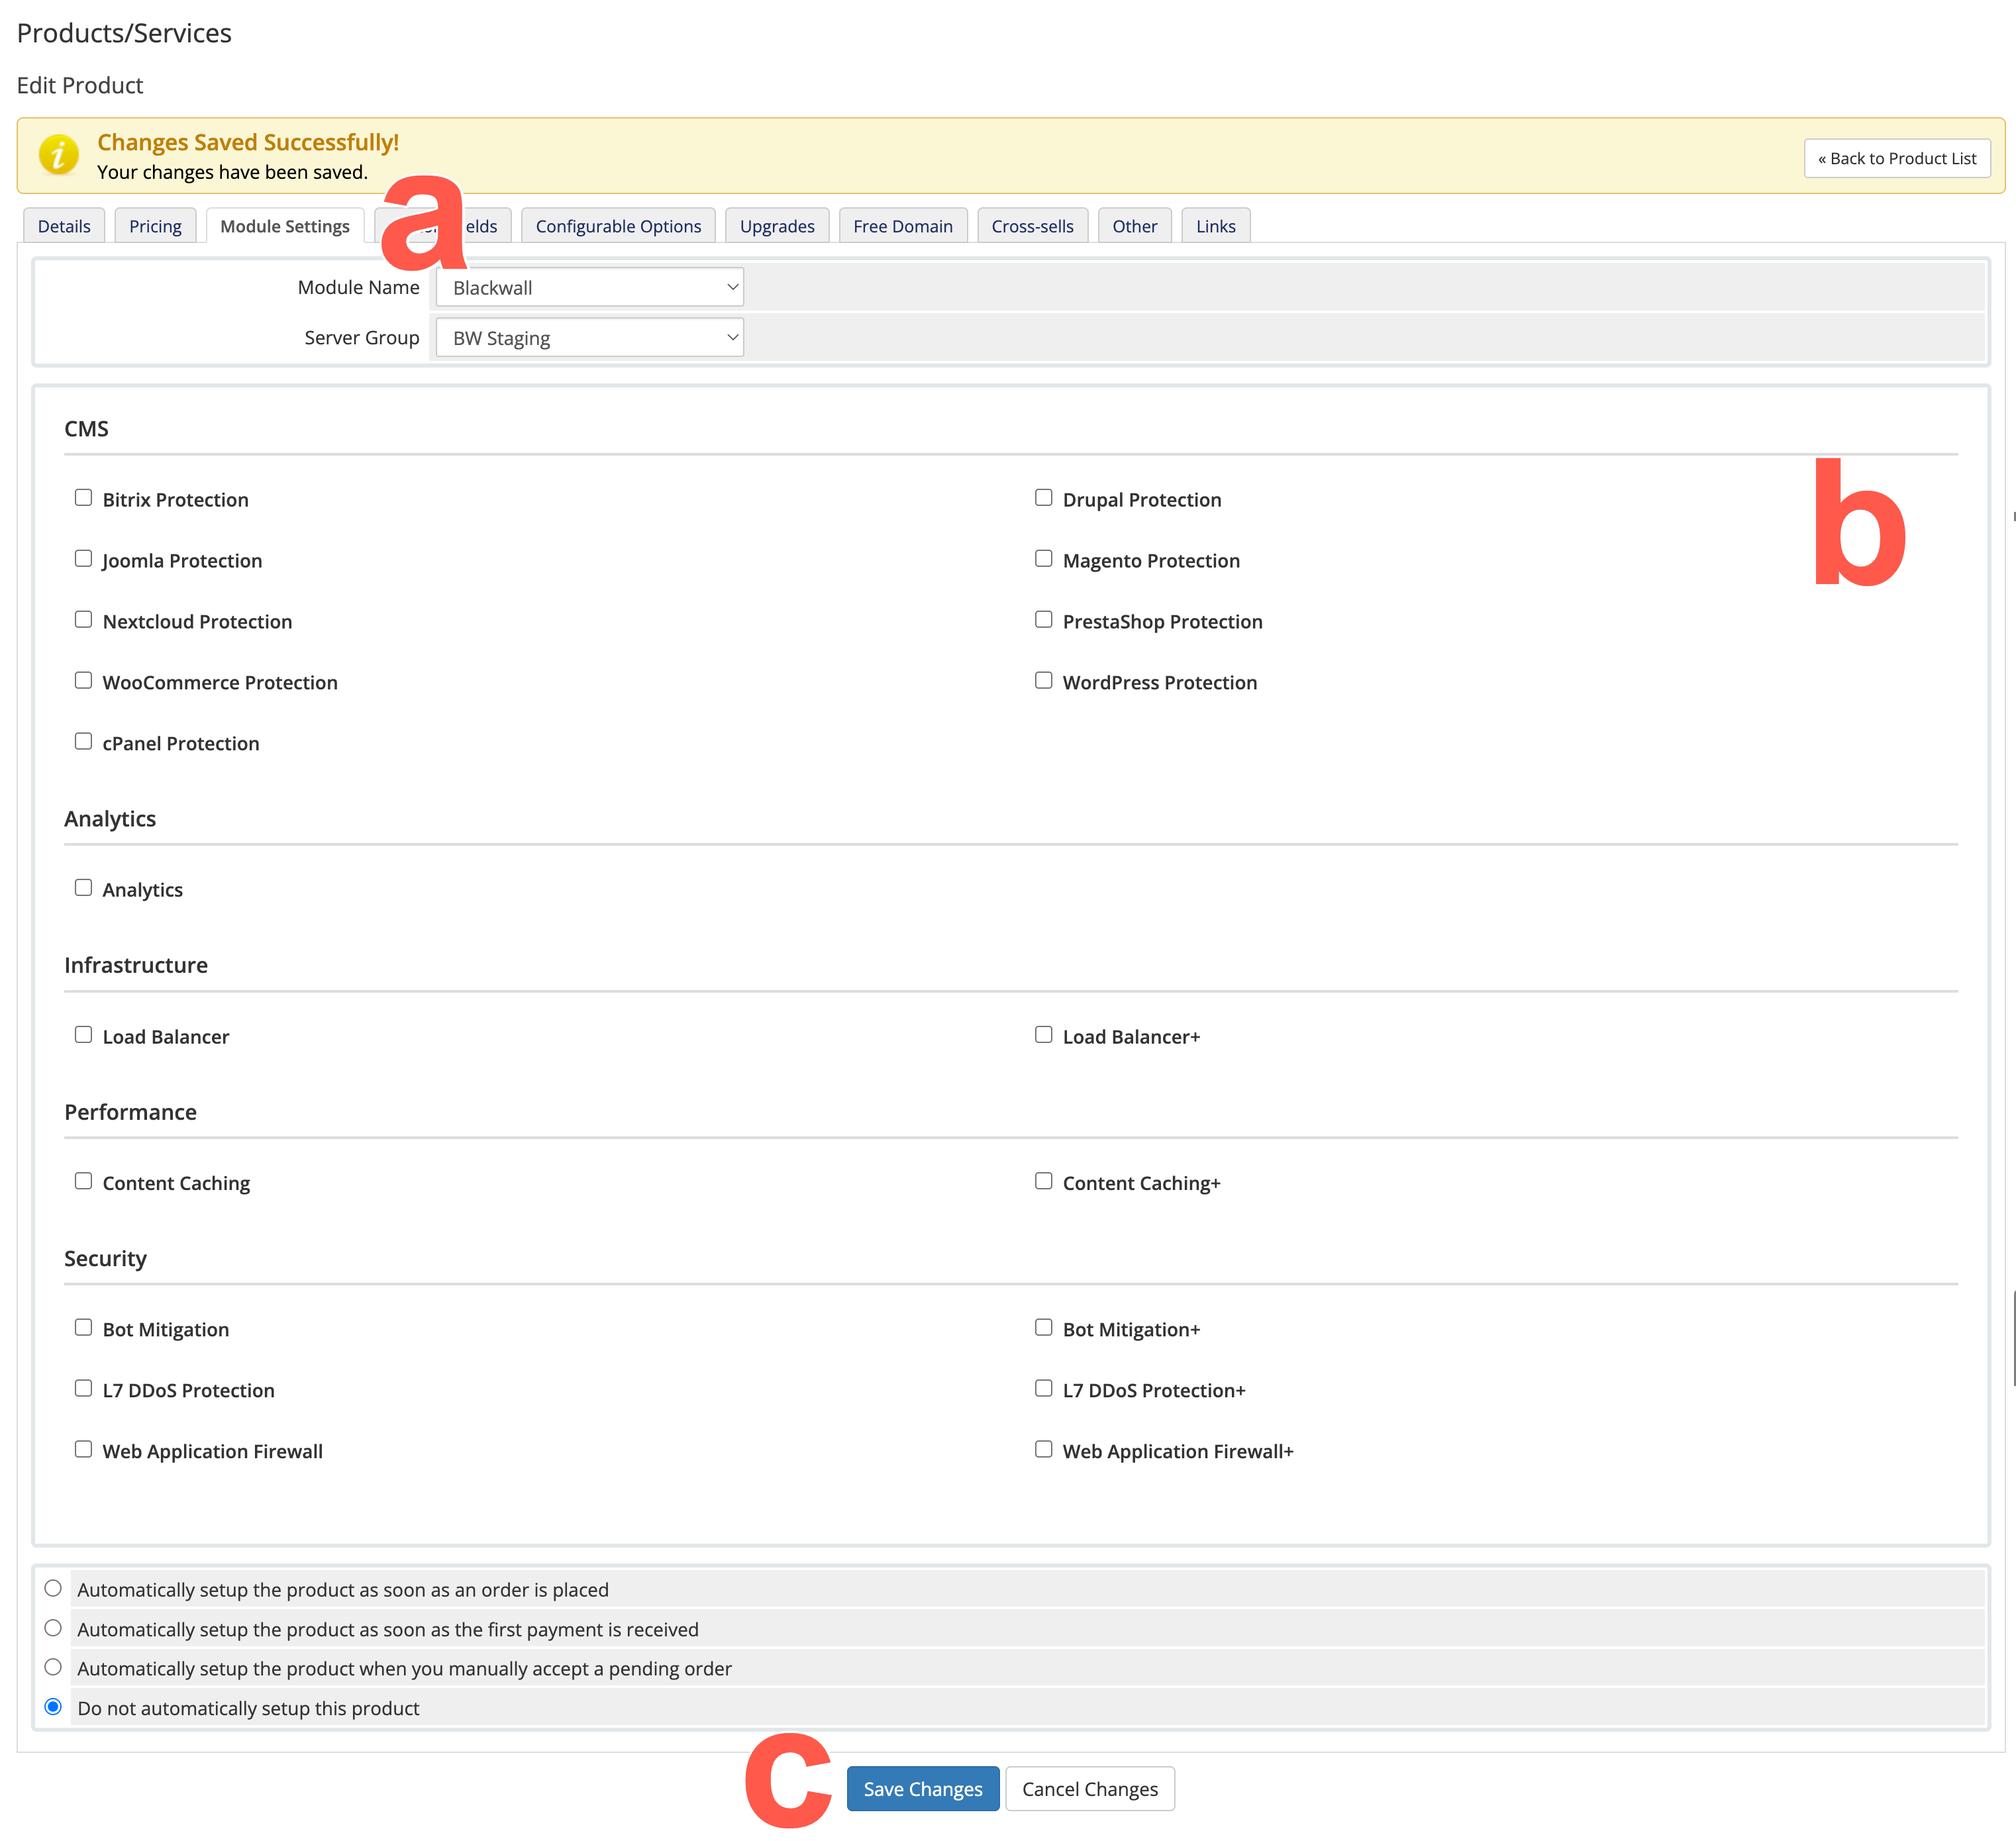
- Select the checkboxes for the components that you want to include in your new product.
- Click Save Changes.
- After saving changes in the previous step, various component options display on the Module Settings page.
Each product can use a different Server Group. This allows you to connect different products to different GateKeeper instances, which in turn provides flexibility.